Saturday, 10 October 2009

Fix One Hole and Find Another

Today has been spent filling and repairing holes in the bulkhead.

Mundane and not very satisfying work, takes a great deal of time and not much to show for it.

First job was to patch the original servo and clutch cylinder holes and mounts. With the modified ABS servo fitted, these holes were left open to the engine bay, and must have allowed noise and fumes into the car.

So plates fitted and mounting bolt holes filled. To fill the bolt holes, I did not let in plates, but held a copper plate to the rear of the hole and simply filled with weld - the weld does not stick to the copper, so it makes small holes easy to fill, although there is a fair bit of weld to grind back after.


And from inside the car


Rusty hole in the plenum


I cut an area out approx 3cm by 2 cm and let in a plate


More rusty holes in the plenum, because the rust was extensive, I cut the metal away and fitted an L shaped plate into the metal


Finished here


And a view from inside the car showing the penetration marks from the spot welds in the edges of the plate - this is always a good sign and confirms that the spot welds created by welding through a small hole in the plate on the other side have taken and actually formed a weld into the metal behind.
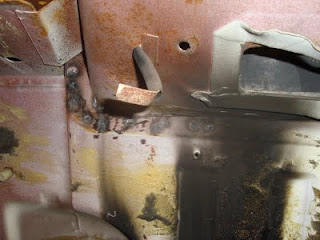


Finally the last hole, not as bad as the one on the driver's side of the transmission tunnel.


And repaired here


Thats it, (I hope) bulkhead repaired and no more holes currently visible in the engine bay that shouldn't be there.

Apart from this blog, I have been keeping a record of the hours worked on the car (not counting parts finding expeditions) and I am now up to a grand total of 293 hours. I wish someone was paying for this at £40 per hour or so!


Tuesday, 6 October 2009

Rust, is there no end to the rust?

Its not the rust that I know about, its the new rust in strange areas that I find, that I object to. Why has it rotted by the top of the tunnel??

Remove the front bulkhead pad, and there's 2 more holes, either side of the gearbox tunnel in the bulkhead, and both extending into the tunnel. The other side is the same. Its a 3 panel patch to repair nicely too


So not quick, a plate in the tunnel, and 2 on the bulhead, a (w)hole afternoons work, still first one finished and looks like this


The truth is I am putting off the wheel arch repair, I cannot get the repair panels to fit nicely, so rather than bodge it, I go and do other jobs on the car, its not as if I am short of them!

Got a new propshaft made for it today too MAC Propshafts in Coventry, and Polybushes from Canley Classics, so by the time the body is finished I should have everything ready to go back on the car.

Took a load more items off for powder costing too.

I am having another attempt at getting the engine to turn. I have been using Hammerite rust dip on parts for the 5, and unlike other rust removers, it leaves clean bare metal, not a converted solid rust barrier, so a load of this has been poured down the bores. I intend to leave it a week, then reapply to each bank with the engine canted over, so that it also fills the combustion chambers as 2 pistons are near tdc, and being a V8 I suspect I am not getting the solution to the area of the piston at the top of the bore in the area of the V - I will report on the outcome.

Saturday, 3 October 2009

Radiator Support and other bits

I didn't get as much done on the estate today as planned, 2 reasons:-

1). a hangover
2). a puncture necessitating a tyre repair and visit to the local KwikFit.

Anyway, these arrived in the week, new radiator (discount offer from Rimmers) and the radiator support panel from a Stag, that had been on back order for months.

So fitted the Stag radiator via its top mounts - its a bit of a squeeze in a 2500 engine bay, and bolted a cut down radiator support panel to its lower threaded support mounts

Tacked the panel in place

Fabricated some end supports from the chassis rails to the support panel, and here it is all finished

Radiator put back for a test fit of the completed support, as you can see here only a few mm between it and the Stag battery box.

By this stage I didn't feel up to the complexities of repairing the inner wheel arch lip, so I contented myself in filling the large hole cut in the inner wing for the antenna

So I guess it will be back to the inner wheel arch tomorrow

Sunday, 27 September 2009

Front Wing

Before working on the inner wheel arch, I need to trial fit the front wing, so I can align the wheel arch flanges. I had noticed that the top flange where the wing fits was very thin - probably because the old wing had been brazed on, which had allowed more than normal corrosion on the top flange (it wouldn't have been as tight a fit as is normal when spot welds are used), so I replaced the top of the flange with new metal.

The rest of the day has been spent adjusting the wing fit, its still not quite spot on, as its about 2 mm higher at the rear of the headlamp closing panel now - perfect at the front, but not quite right at the back.

It will do for now, as I can make more adjustments as I fit and remove the wing while working on the inner wheel arch.

So here's the new wing trial fitted.


Not much obvious progress for an entire day, but this has to fit well, as any errors will be very obvious when the car is painted. The rear fit on the sill, windscreen panel and door area are good.

I can now repair the inner wheel arch


Saturday, 26 September 2009

The other side.

Because of the slight differences in the length of the new rear wing compared to the old, I have decided to leave the rear of the estate until the other side is done, to see if the other new rear wing has a similar increase in length. if so I can adjust the tailgate to suit.

So we turned the car round today - its quite light at the front without an engine.


Removed the driver's side front wing. This was a replacement brazed on (an MOT fail if spotted now, I believe). The inner wheel arch is in better condition than the other side, but the top of the scuttle area is much worse.


I also found this horrible bodge, an access plate, secured with self tappers in the inner wheel arch, to gain access to the car radio aerial.

Started with a repair to the front of this box section.


Then cut out the rear as before, the corrosion extended much further back than the other side, past the top wing mounting flange.


Repaired as before, the top of the box section.


Then added the rain channel support


Then the top closing section of the plenum, and formed the water gutter at the same time.


There is a small amount of distortion where the replacement panel joins which will require some lead loading later on. I have still to fabricate and locate the top wing mounting flange, but I will do that when I fit the wing to make sure it is the correct height.

Inner wheel arch next.

Friday, 25 September 2009

With thanks to Adrian from FFD

I was recently contacted by a gentleman who used to work at FFD.

He kindly sent me a copy of the car's build record there


Interesting when compared to the build date on the Heritage certificate of 21st August 1972, but at least I now have the original UK Registration number (YKV201L) to reapply for, which I have checked has still not been allocated by the DVLA. I will also be able to search their records for any other previous history.

The date of build is only a few days later than Mr Pearsons V8 engined car - which I recall was built about 17th August 1972, however his car has an early number Stag engine (in the 900s) but mine has an engined numbered LF20618.

I was also sent the records for the 2 other Triumphs modified by FFD at this time

It is believed that the Saloon has been scrapped and the estate is known to reside in a collection in a Swiss town - these were both 6 cylinder engined cars.

He is hoping to come and look at the car this month, with 2 other ex employees of FFD who he believes worked on this car.

I shall have a great number of questions to ask!

In an email to me he recounted some of this history, so in his own words here it is:-

I’m not sure how much I can tell you but, at the risk of putting you to sleep, here’s a little of what I know. FFD were pioneers of 4WD road cars. Funded originally by Harry Ferguson and continued by Tony Rolt, they tried to bring the ideas of 4WD, Anti-Skid brakes and a few other ideas to the motor industry’s attention. Origins go back to pre-WW2 Rolt/Dixon cars and in 1971, FFD sold the patent rights to a thing called a Viscous Coupling to GKN. As part of that deal, a variety of cars of the day were converted to 4WD, using a VC as the controller of the centre differential, as demonstrators of the technology, funded by GKN. Your car is one of these. Two Stags and a couple of 2.5 Estates, privately funded by friends of FFD owner Tony Rolt, completed the Triumphs. The GKN cars later passed into private hands also, it appears largely as novelties for GKN bosses! FFD boomed when Audi produced the Quattro and the whole motoring world beat a path to our door for consultancy and prototype designs/converted cars.

Thank you again for this information.

Next back to the welding!


Sunday, 6 September 2009

Parts Progress

Although I have been away working, I have managed some estate related progress.

Finally found a nice set of Black velour front seats - needs a diaphram for the drivers seat, so this will probably need replacing with seat webbing, and they need seat runners.

Got these New Old Stock triumph parts:-

Rear Tailgate seal,

Door seal

1/4 light seal,

rear door handles,

and front horse shoe

and these:-

interior light,

speedo cable,

rear mudflaps,

rear estate window seal,

wiper motor

centre air vent

rear boot trim
and finally these:-

front door handles,

column wiper switch

speaker grill

heater cable

and some konis for the front


thats all for today.

Where am I?