There's a space in my garage, I towed the estate to Macclesfield today, to JP Exhausts. The car was put on their ramps, and they scratched their heads a little, but there is now a plan as to how to fabricate the exhaust.
Because of the estate "boom" issues I asked for 2 or 3 silencers, I think quiet is better rather than cherry bomb noise in such a refined vehicle, so the plan is as follows.
The driver's side manifold will follow the normal Stag route of exiting down by the oil filter, but the other bank will exit at the front, be taken round the front of the engine, between the antiroll bar and the steering rack subframe and then backwards to join the driverside exhaust Y fashion at the back of the gearbox in a single pipe. The first silencer will then sit in the large recess under the driver's seat. The pipe then follows the transmission tunnel with a small inline silencer and hoop over the driveshaft through the sub frame arm as normal. A further silencer will then be fitted under the boot floor (as I still have the spare wheel housing lump projecting down under the boot floor), exiting in twin pipes Stag fashion. Not easy to describe, but I will get pictures when I collect the car in 2 to 3 weeks time.
They had some nice machinery in there too - a Metro 6R4 complete with a custom manifold with 32" primaries that they had just finished.
So while the estate's away I shall finish the rear seats and check what parts I am missing to finish the machine - might make Stoneleigh yet!
4 hours work today.
Tuesday, 17 January 2012
Sunday, 15 January 2012
Radiator and Interior
First job this frosty cold morning (and no there will be no pictures of my thermal overalls) was to fit the radiator, and the first snag became apparent, there's no way it will fit with the conventional engine fan and viscous coupling. I guess my new radiator is thicker than the original, so it was off with the viscous coupling, radiator in, and an electric fan on the pending purchases list - at least it won't hold up the exhaust fitters.
Then it was time to complete the headlining so I could replace the screen. I still cannot get all the wrinkles out, but its not too bad, and its clean, so I spent the rest of the day after fitting the screen, fitting the B post covers, the grab handles, coat hook, sunvisors, interior lamp and rear view mirror. i can assure you its a lot quicker to say that than to do the jobs - the worst issue was locating the mounting holes through the new headlining, in the end I cut pieces from the old lining where the parts were fitted and used the holes in the old lining to identify where the new holes in the new lining should be, so at the end of the day the interior looks like this
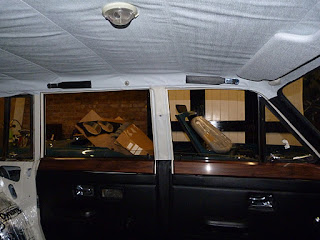

Finally I fitted the D post covers that I had recovered the other day

Another 7 hours worked so the total is 857
And with that work done I have now completed 15 of the 45 jobs on my remaining jobs list.
While the estate is away having the exhausts made I am going to finish the seats, the inlet manifold should be back with the threads recut where the water bypass pipe connects, so on its return I will re-shim the cams, fit the maniold, carbs and distributor and have a go at bringing the engine back to life
Saturday, 14 January 2012
Its all a rush now
When I made an appointment to have the exhausts and manifolds made up for the car in late November I thought I had plenty of time to complete the jobs required before delivering the car to Macclesfield next week. Just shows how wrong you can be and how some jobs take forever........
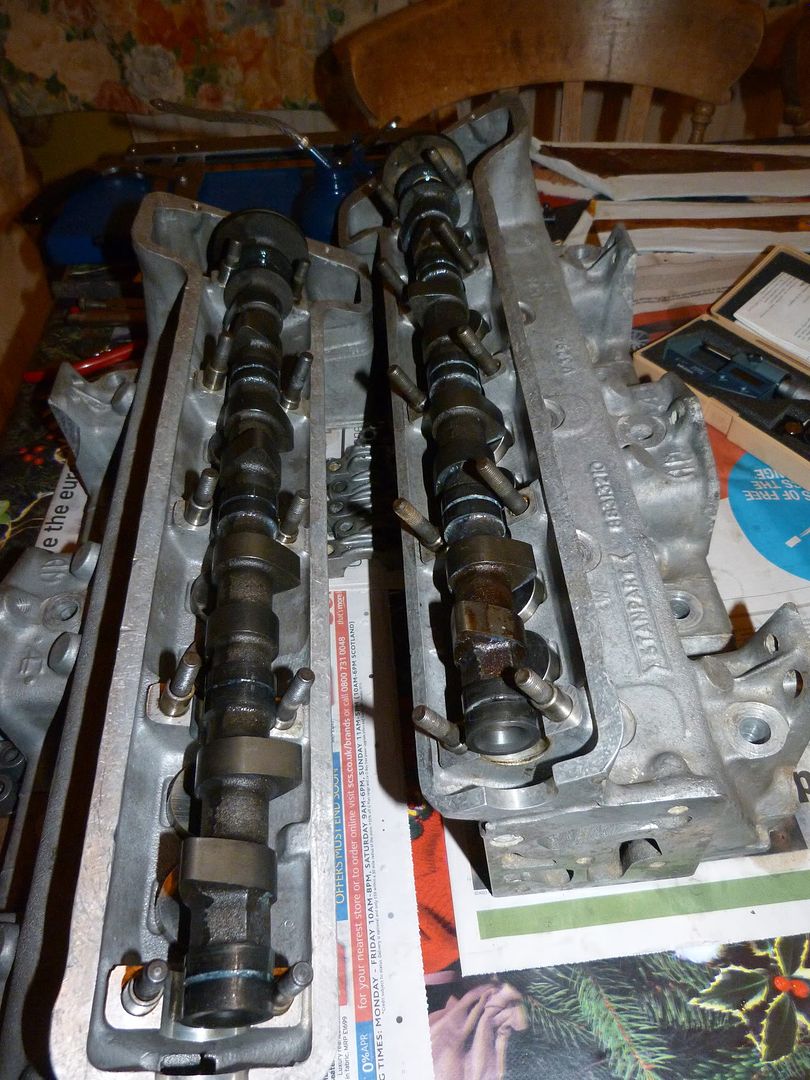
So I started Friday morning with the heads apart and waiting for tappet shims,

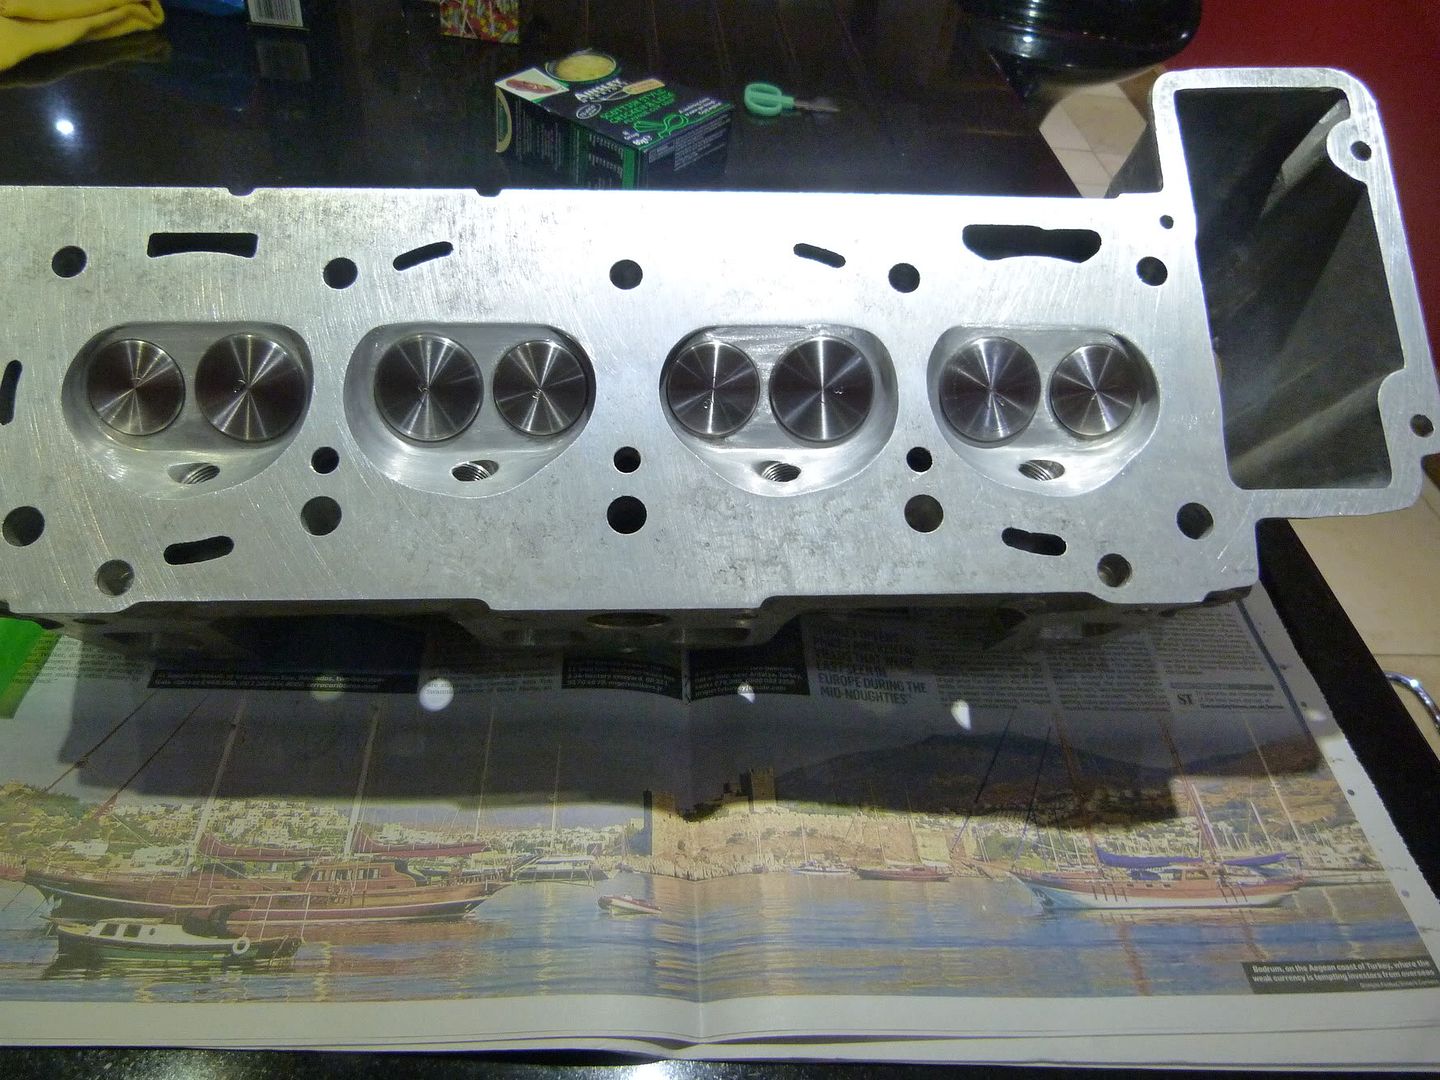
after a few unsuccessful attempts to get shims I built the heads up, and removed the gaffer tape and polythene that had been protecting the engine. So right hand head on first and timing gear. Note the genuine Payen head gaskets, and (in the left hand side bank facing you) the use of head studs in the lower bolt holes to hold the gasket in place and guide the head on - after the heads in place fit the bolts and remove the studs to their correct location.
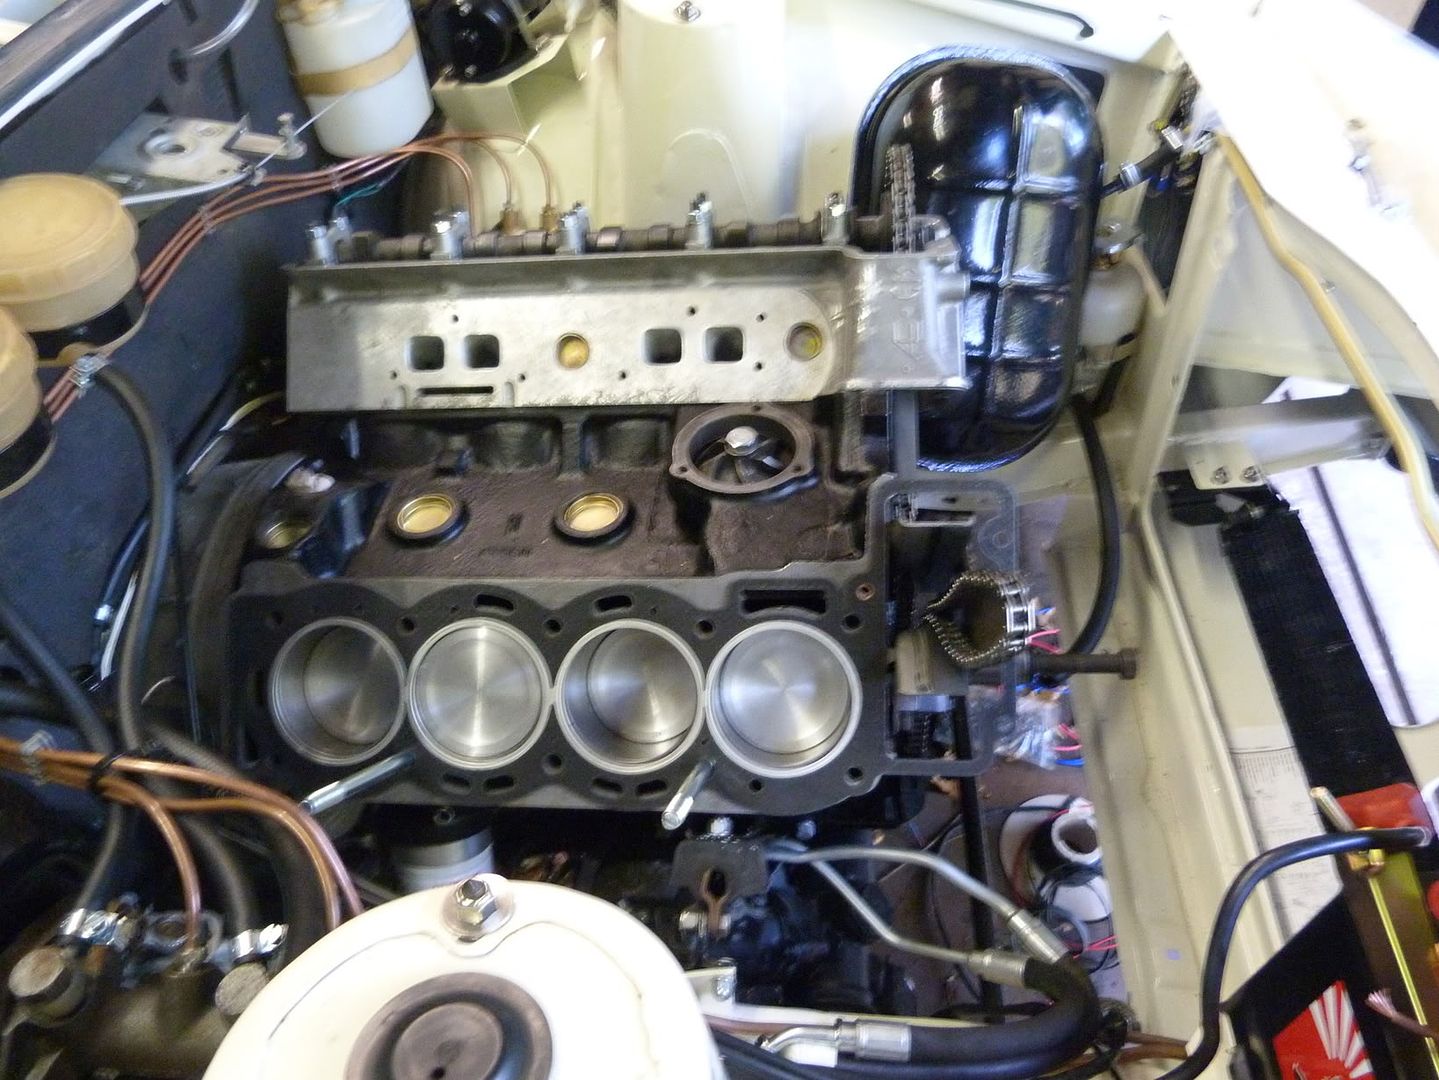
Other head in place - I had trouble with the rear most stud fouling the brake servo, in the end I had to put the stud into the head and then fit the head and tighten the stud up
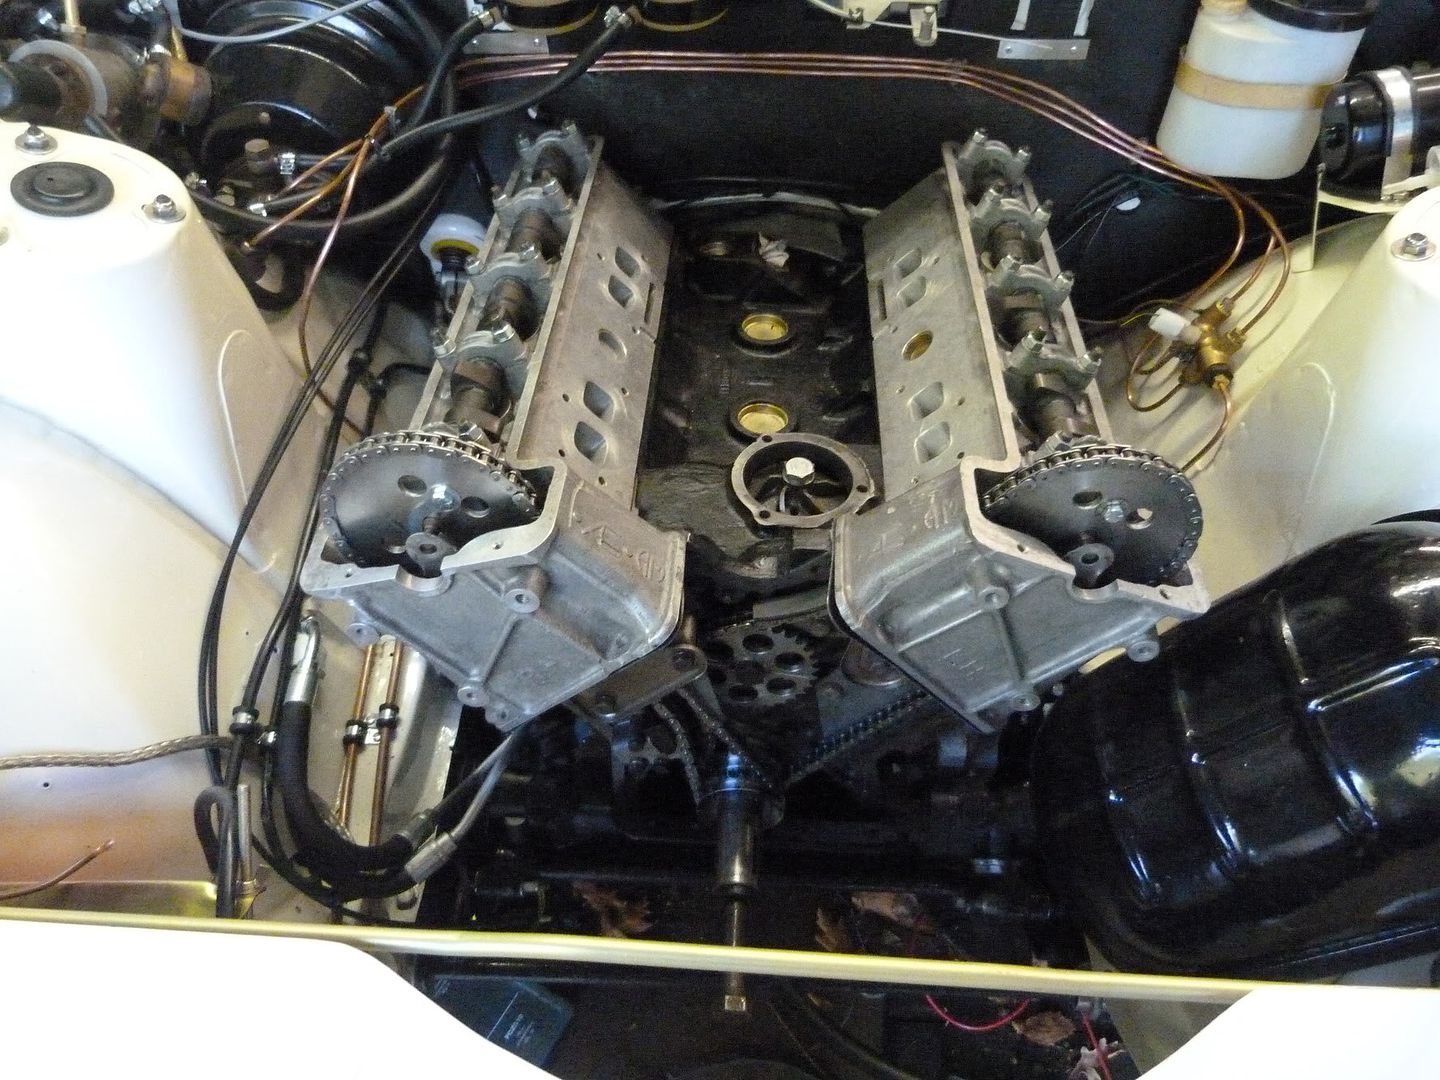
All timed up, each cam has been set 2 degrees advanced to allow for chain stretch, although I don't expect the IWIS (Mercedes chains from LD Parts) to stretch much. Neither head is torqued down at present.
That was Fridays work - 6 hours worth.
Saturday morning, freezing outside so a chance to use my thermal overalls.
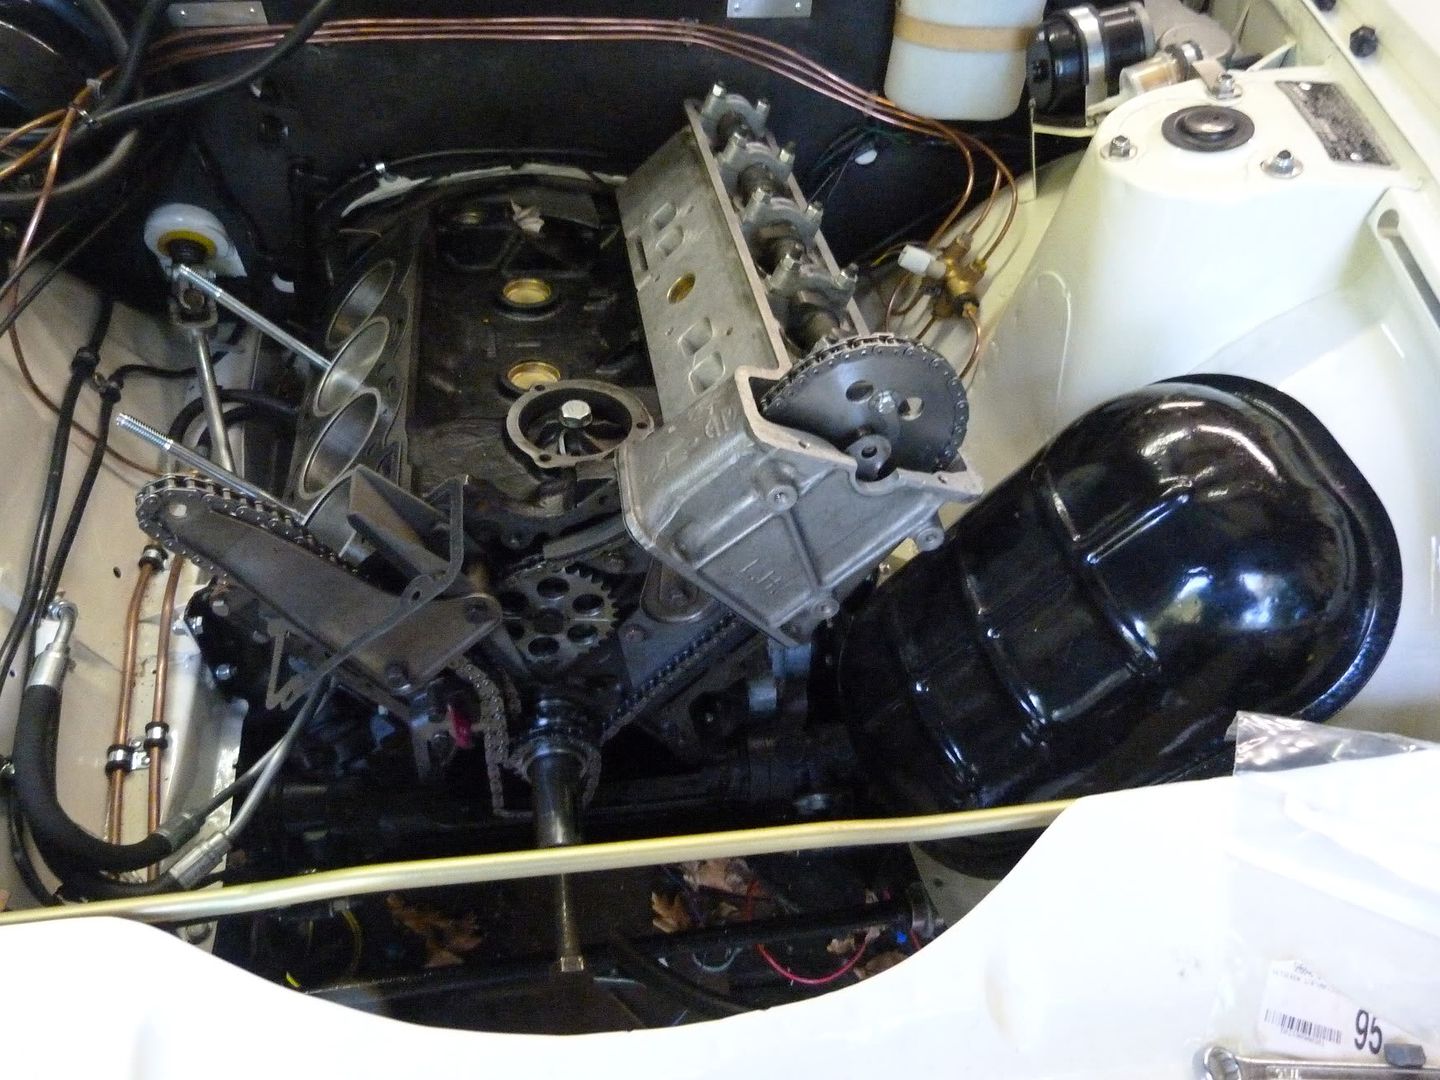
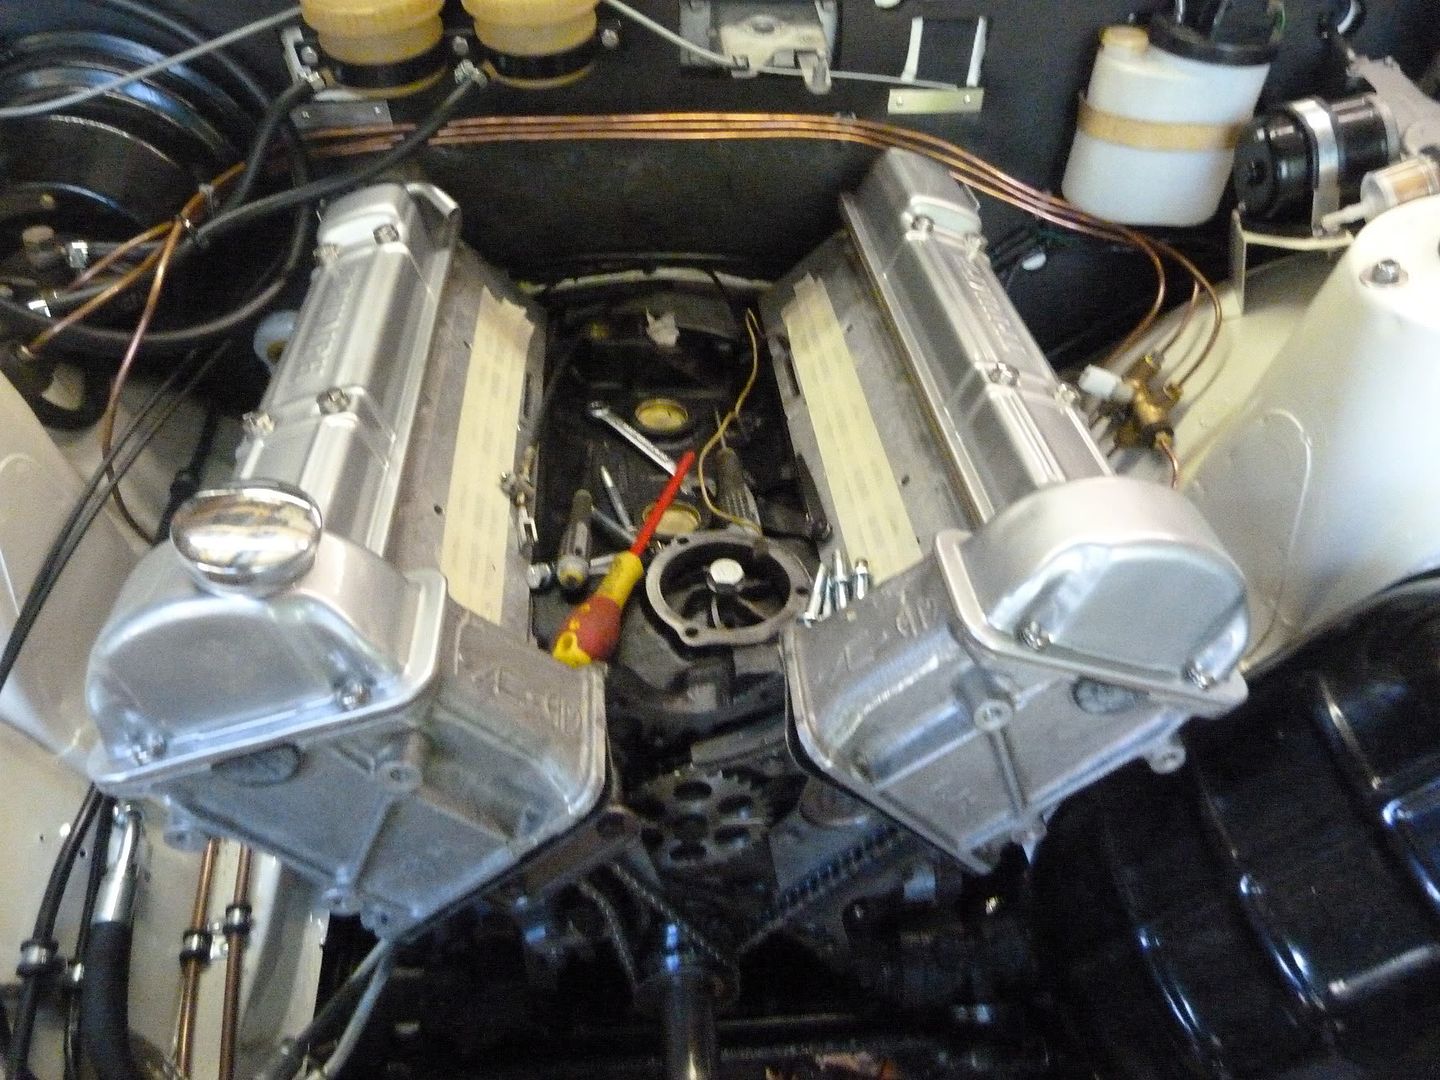
Firstly using silicon sealant I glued the cam cover gaskets to the cam covers - makes removal and replacement easy

These were then fitted - starting to look like a complete engine now
So time to fit the timing chain cover, this is why the heads have not been torqued down yet, ideally it lets you lift the heads a little to fit the cover between the sump and the head, I usually lift the heads 2mm or so with some small folded pieces of metal between the block and the gasket near the timing chains

If you look carefully you can see that I have used cap head screws in the 2 front bolts in the head to the timing cover - Triumph originally used bolts with smaller heads than normal to fit, and you cannot get these anymore - the cap heads come from LD Parts again.
Now you can torque down the left hand head only - you do the righthand one AFTER fitting the inlet manifold - mine is absent having a corroded fitting machined out, but it doesn't need the inlet manifold to have the exhausts done.
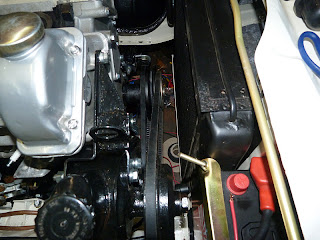
Next job was to get the power steering pump and alternator on
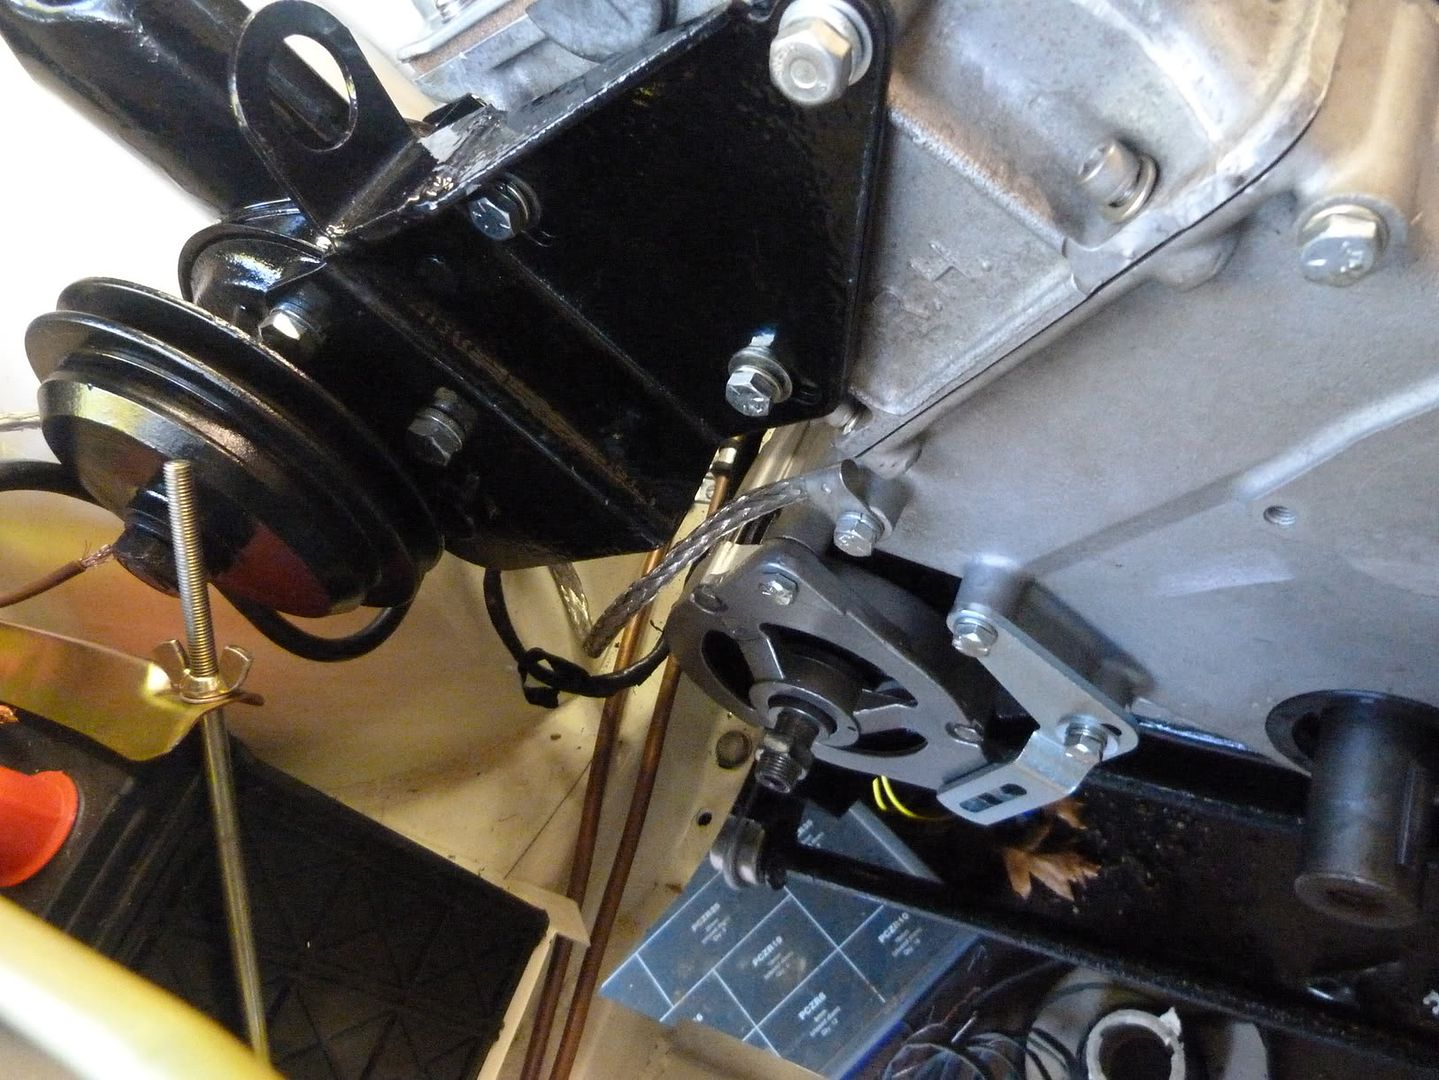
Followed by the front pulley and the 2 drive belts
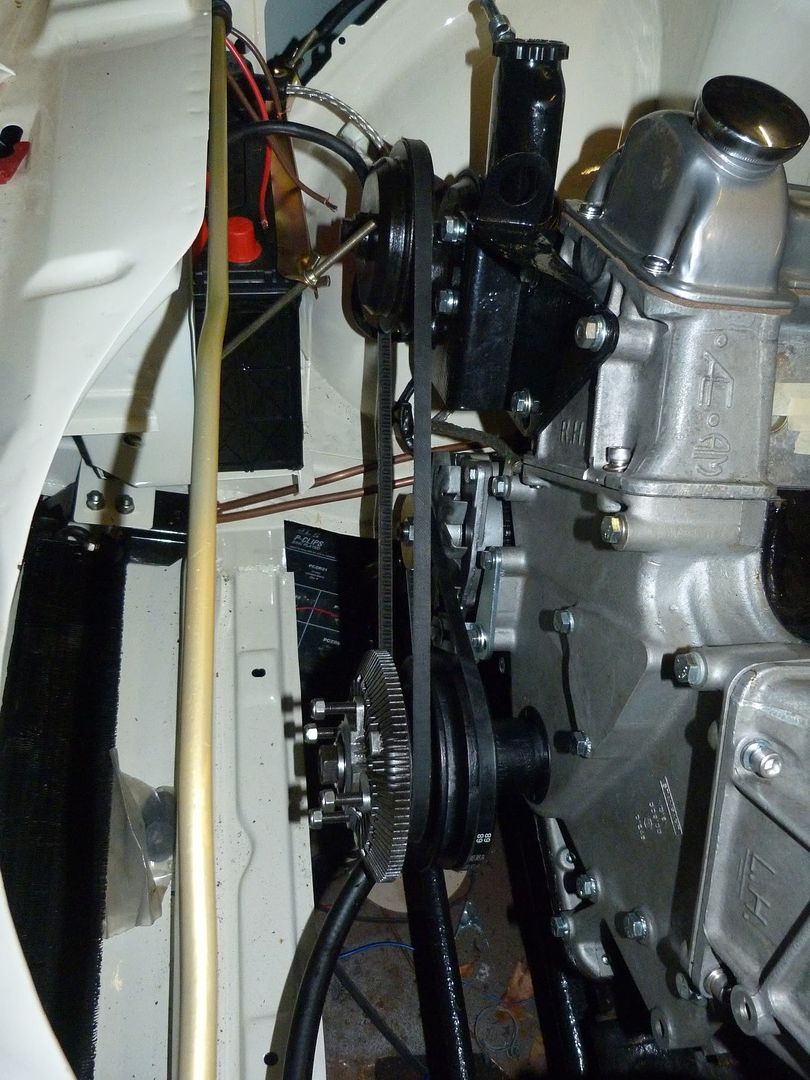
I am having some difficulties with the pipes from the power steering pump to the rack - they don't fit at all - this is due to the servo block on the rack being rotated out of its normal position - some thoughts are needed about this.
Tomorrow its radiators and pipe work, and headlining and refit the front screen so the car will then be ready for the manifolds. Its been important to get all the engine ancillaries on, so the exhaust people know what they have to work round
9 hours work today, so the total is now 850 hours
So I started Friday morning with the heads apart and waiting for tappet shims,
after a few unsuccessful attempts to get shims I built the heads up, and removed the gaffer tape and polythene that had been protecting the engine. So right hand head on first and timing gear. Note the genuine Payen head gaskets, and (in the left hand side bank facing you) the use of head studs in the lower bolt holes to hold the gasket in place and guide the head on - after the heads in place fit the bolts and remove the studs to their correct location.
Other head in place - I had trouble with the rear most stud fouling the brake servo, in the end I had to put the stud into the head and then fit the head and tighten the stud up
All timed up, each cam has been set 2 degrees advanced to allow for chain stretch, although I don't expect the IWIS (Mercedes chains from LD Parts) to stretch much. Neither head is torqued down at present.
That was Fridays work - 6 hours worth.
Saturday morning, freezing outside so a chance to use my thermal overalls.
Firstly using silicon sealant I glued the cam cover gaskets to the cam covers - makes removal and replacement easy
These were then fitted - starting to look like a complete engine now
So time to fit the timing chain cover, this is why the heads have not been torqued down yet, ideally it lets you lift the heads a little to fit the cover between the sump and the head, I usually lift the heads 2mm or so with some small folded pieces of metal between the block and the gasket near the timing chains

If you look carefully you can see that I have used cap head screws in the 2 front bolts in the head to the timing cover - Triumph originally used bolts with smaller heads than normal to fit, and you cannot get these anymore - the cap heads come from LD Parts again.
Now you can torque down the left hand head only - you do the righthand one AFTER fitting the inlet manifold - mine is absent having a corroded fitting machined out, but it doesn't need the inlet manifold to have the exhausts done.
Next job was to get the power steering pump and alternator on
Followed by the front pulley and the 2 drive belts
I am having some difficulties with the pipes from the power steering pump to the rack - they don't fit at all - this is due to the servo block on the rack being rotated out of its normal position - some thoughts are needed about this.
Tomorrow its radiators and pipe work, and headlining and refit the front screen so the car will then be ready for the manifolds. Its been important to get all the engine ancillaries on, so the exhaust people know what they have to work round
9 hours work today, so the total is now 850 hours
Thursday, 12 January 2012
Heads and Headlinings
Bit of a bits and pieces day really. Started with the heads setting tappet clearances with shims, typically by the time I had juggled the existing shims about and my spare shims, I had managed to gap half the tappets accurately, but the other half are way off and I cannot locate anyone with the correct shims in stock. All is not lost because I know a man in Coventry who can grind the shims for me, but not until next week.
The car is going off for its manifolds and exhaust on Tuesday, so I guess the heads will have to go on, and be re-shimmed later
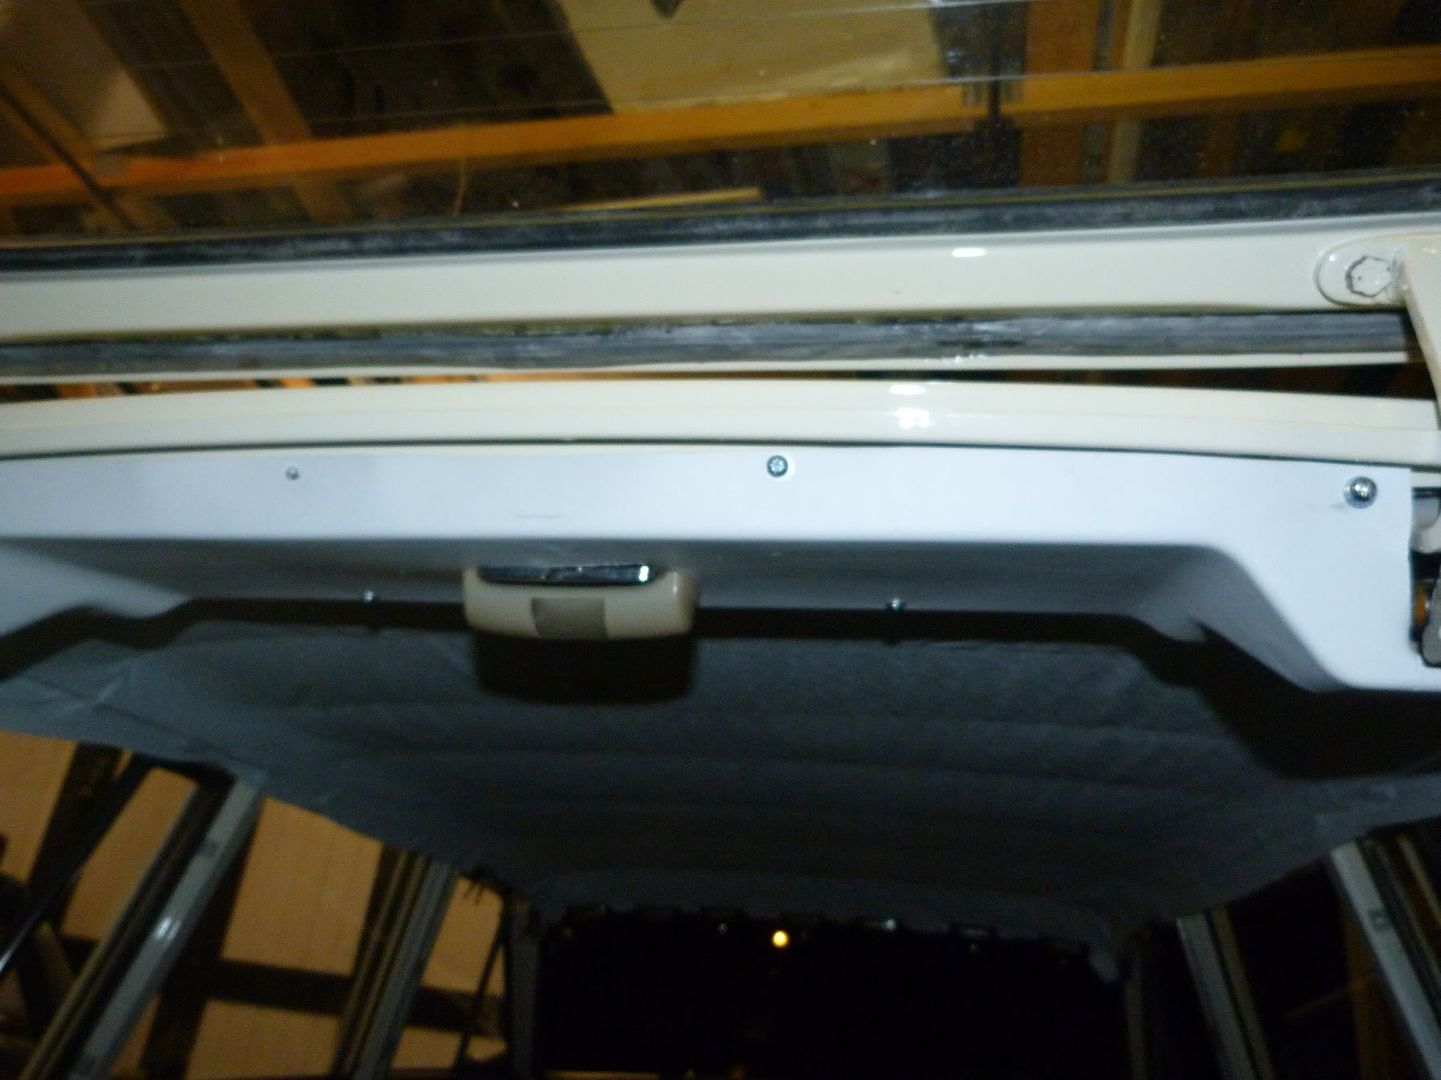
Next job was back on the headlining, I managed to get more wrinkles out (but it still needs a little more work) so I decided to fit the rear tailgate hinge cover that I had repainted. The manual shows this held in place with nuts and bolts, but how they hold the nuts in place is beyond me, so out with the rivnet gun
a few minutes later and 9 rivnuts fitted in place
Metric M5s I am afraid, but it makes fitment and removal of this so easy

I WILL get the remaining wrinkles out, I think its where the material is catching on the hoop bars that hold the lining in place, but its one of those jobs to be done bit by bit.
While doing the lining I was reminded of the state of the C and D post trim covers, which look like this
These were stripped, and repaired
and then recovered to look like this
The C post covers are just cloth strips, so I have saved some material to be applied later
Hours worked now 835 - 8 hours today
The car is going off for its manifolds and exhaust on Tuesday, so I guess the heads will have to go on, and be re-shimmed later
Next job was back on the headlining, I managed to get more wrinkles out (but it still needs a little more work) so I decided to fit the rear tailgate hinge cover that I had repainted. The manual shows this held in place with nuts and bolts, but how they hold the nuts in place is beyond me, so out with the rivnet gun
a few minutes later and 9 rivnuts fitted in place
Metric M5s I am afraid, but it makes fitment and removal of this so easy
I WILL get the remaining wrinkles out, I think its where the material is catching on the hoop bars that hold the lining in place, but its one of those jobs to be done bit by bit.
While doing the lining I was reminded of the state of the C and D post trim covers, which look like this
These were stripped, and repaired
and then recovered to look like this
The C post covers are just cloth strips, so I have saved some material to be applied later
Hours worked now 835 - 8 hours today
Monday, 9 January 2012
Got a head or two
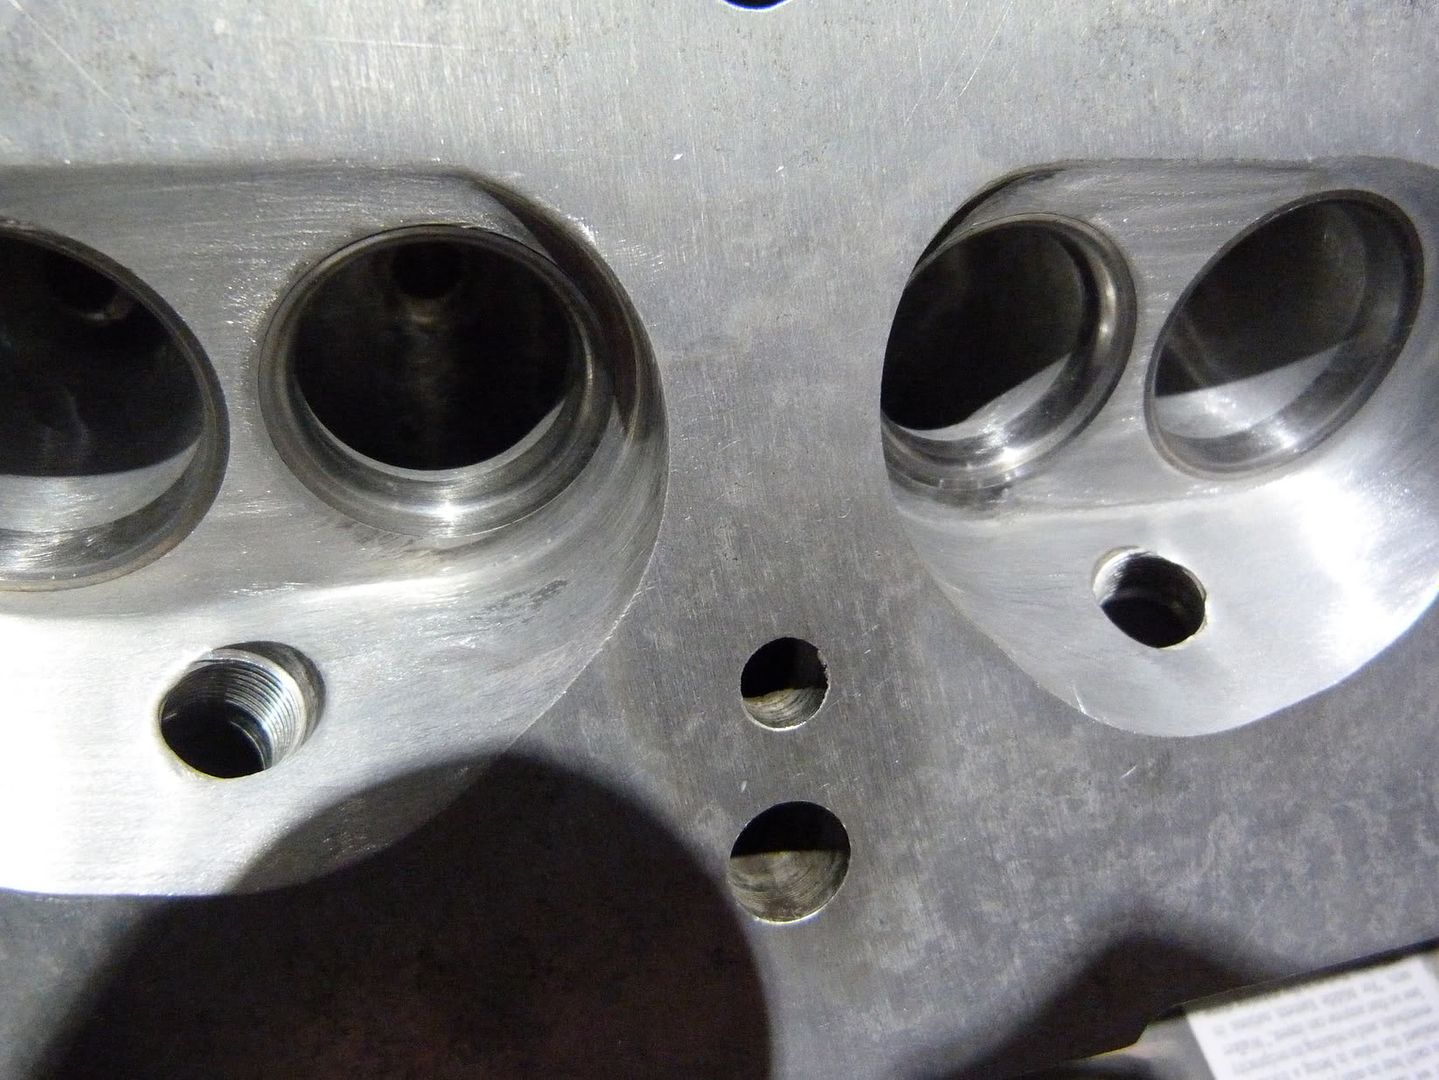
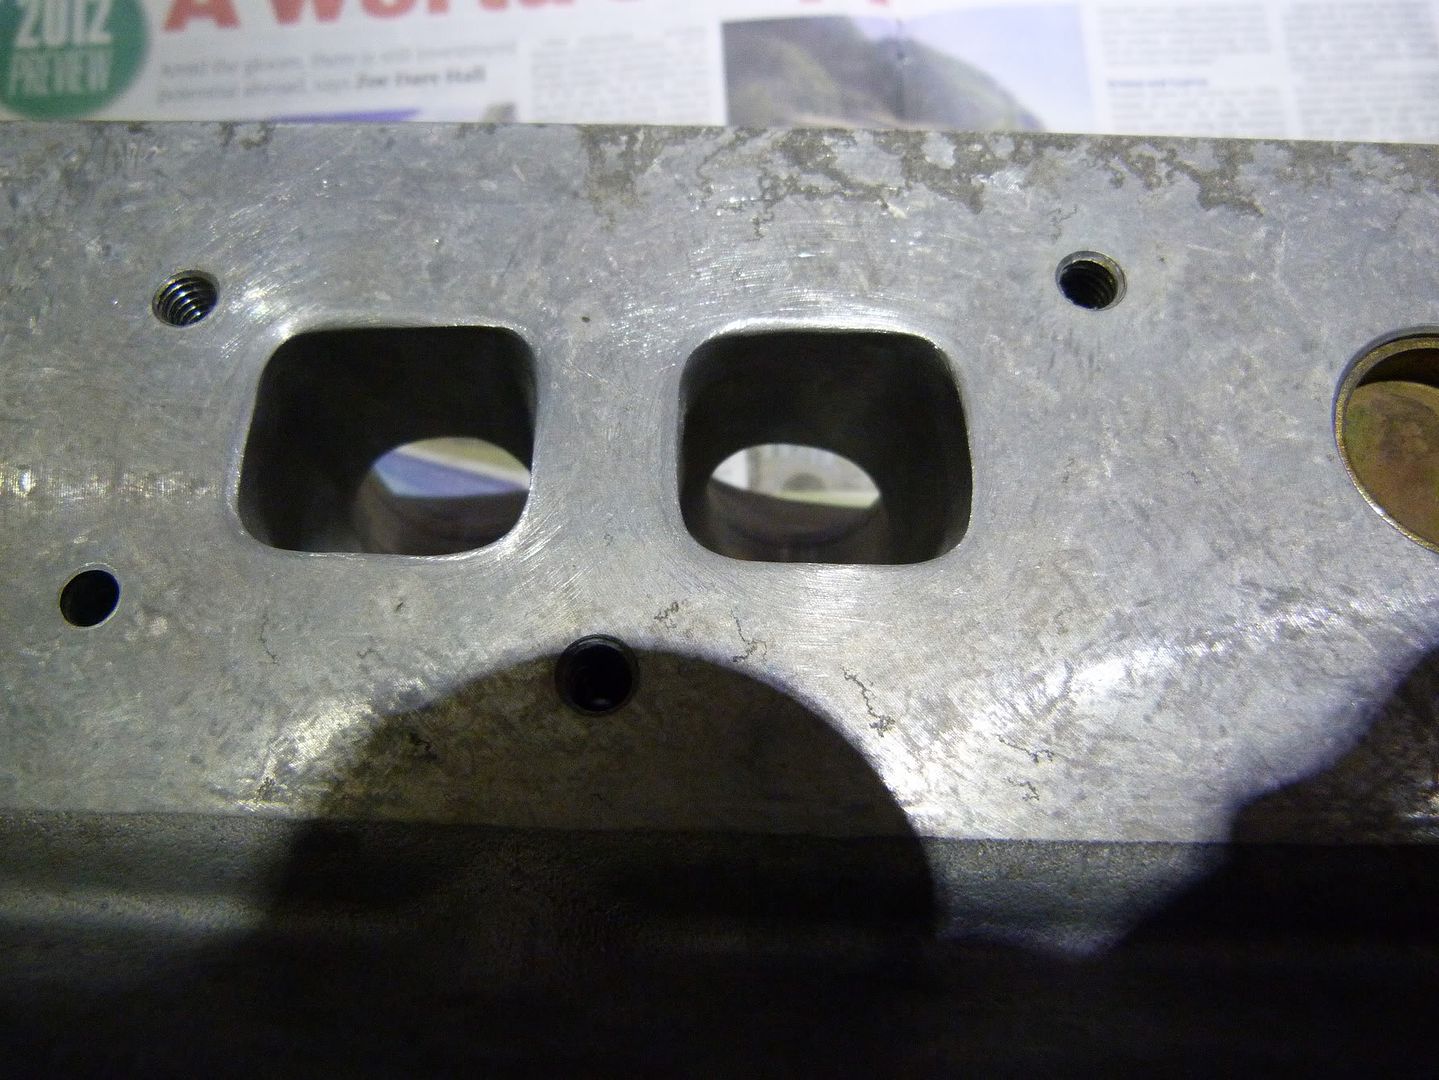
Went to Roy Burrell's today and collected the heads.
Roy has ported them and gently reshaped the combustion chambers to make them breath better, together with some subtle valve reshaping.
Its hard to do them justice in the pictures but here they are, much smoother ports, better radii, and less projections into the flow, got to be worth a few HP


I should have them re-assembled tonight, ready to do the tappet shims tomorrow, got to keep moving as the car is due to have the manifolds made in a week or so
Roy has ported them and gently reshaped the combustion chambers to make them breath better, together with some subtle valve reshaping.
Its hard to do them justice in the pictures but here they are, much smoother ports, better radii, and less projections into the flow, got to be worth a few HP
I should have them re-assembled tonight, ready to do the tappet shims tomorrow, got to keep moving as the car is due to have the manifolds made in a week or so
Sunday, 8 January 2012
Not the job that I had hoped to finish today
I had hoped to finish the headlining today, but after I removed the front screen I realised that I didn't have the spire nuts to hold the sun visors in position, so that's the headlining on hold for a day or two. Although I shall be refitting one of Ted Taylor's new laminate screens when it goes back in
Still work must progress so I attended to a few of the small outstanding jobs. Firstly I cut down and reshaped the new battery bar retention hook, so that's now complete.
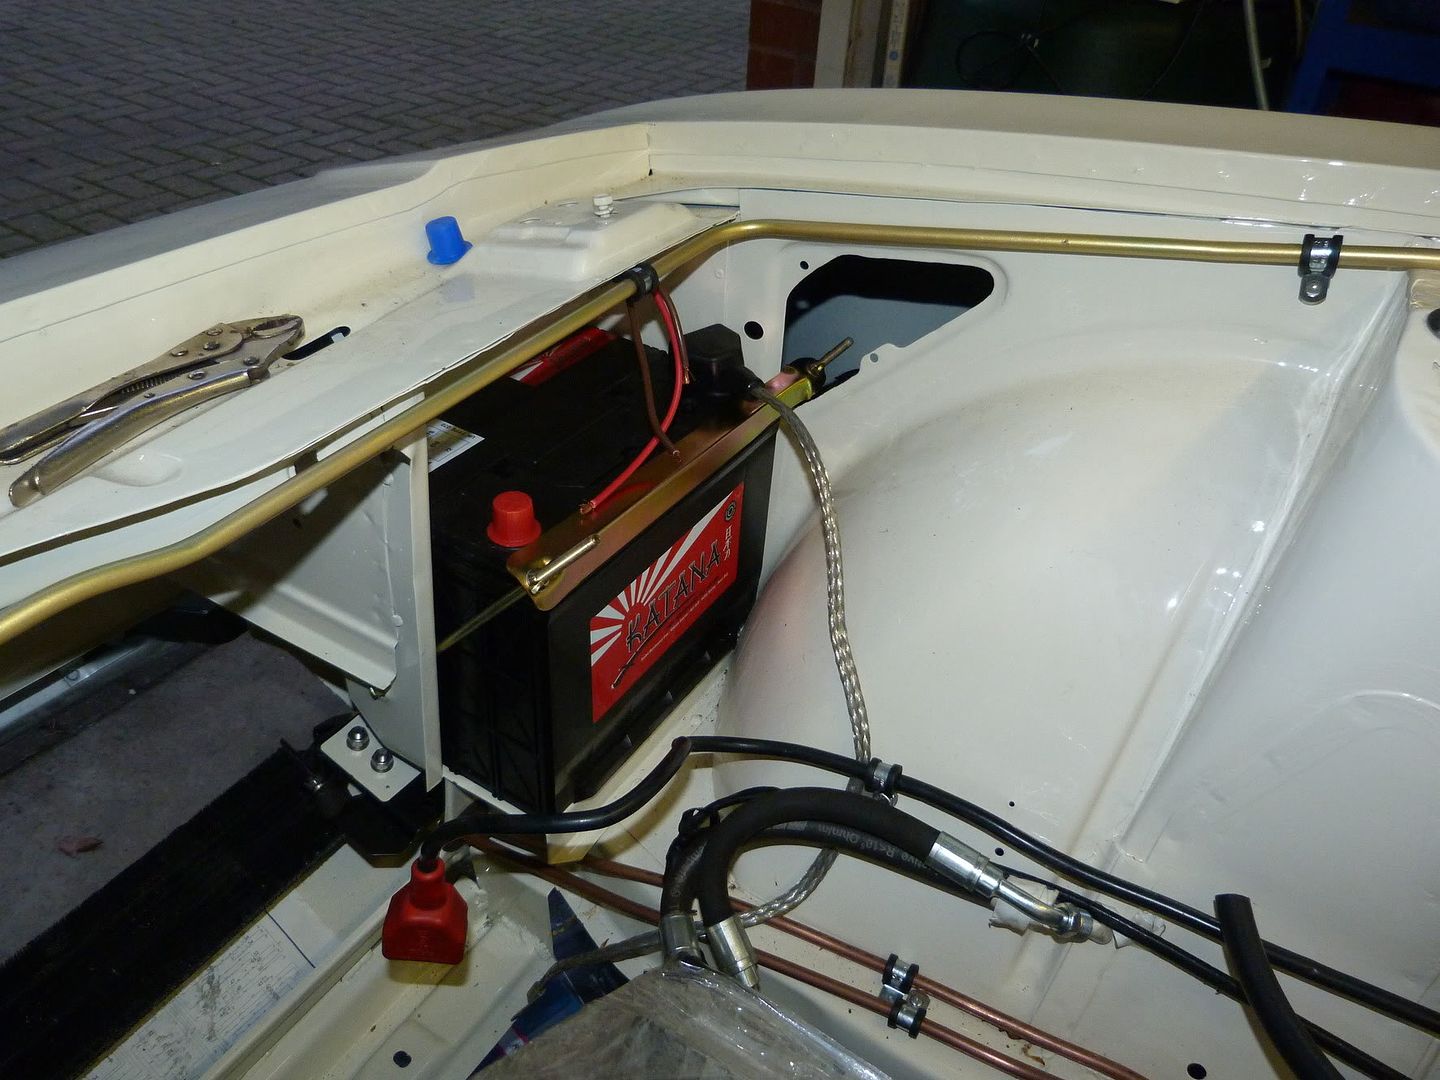
I got the horns fitted and tested. There is normally one each side of the radiator, but because the battery box is fitted on the driver's side, both horns have to fit here

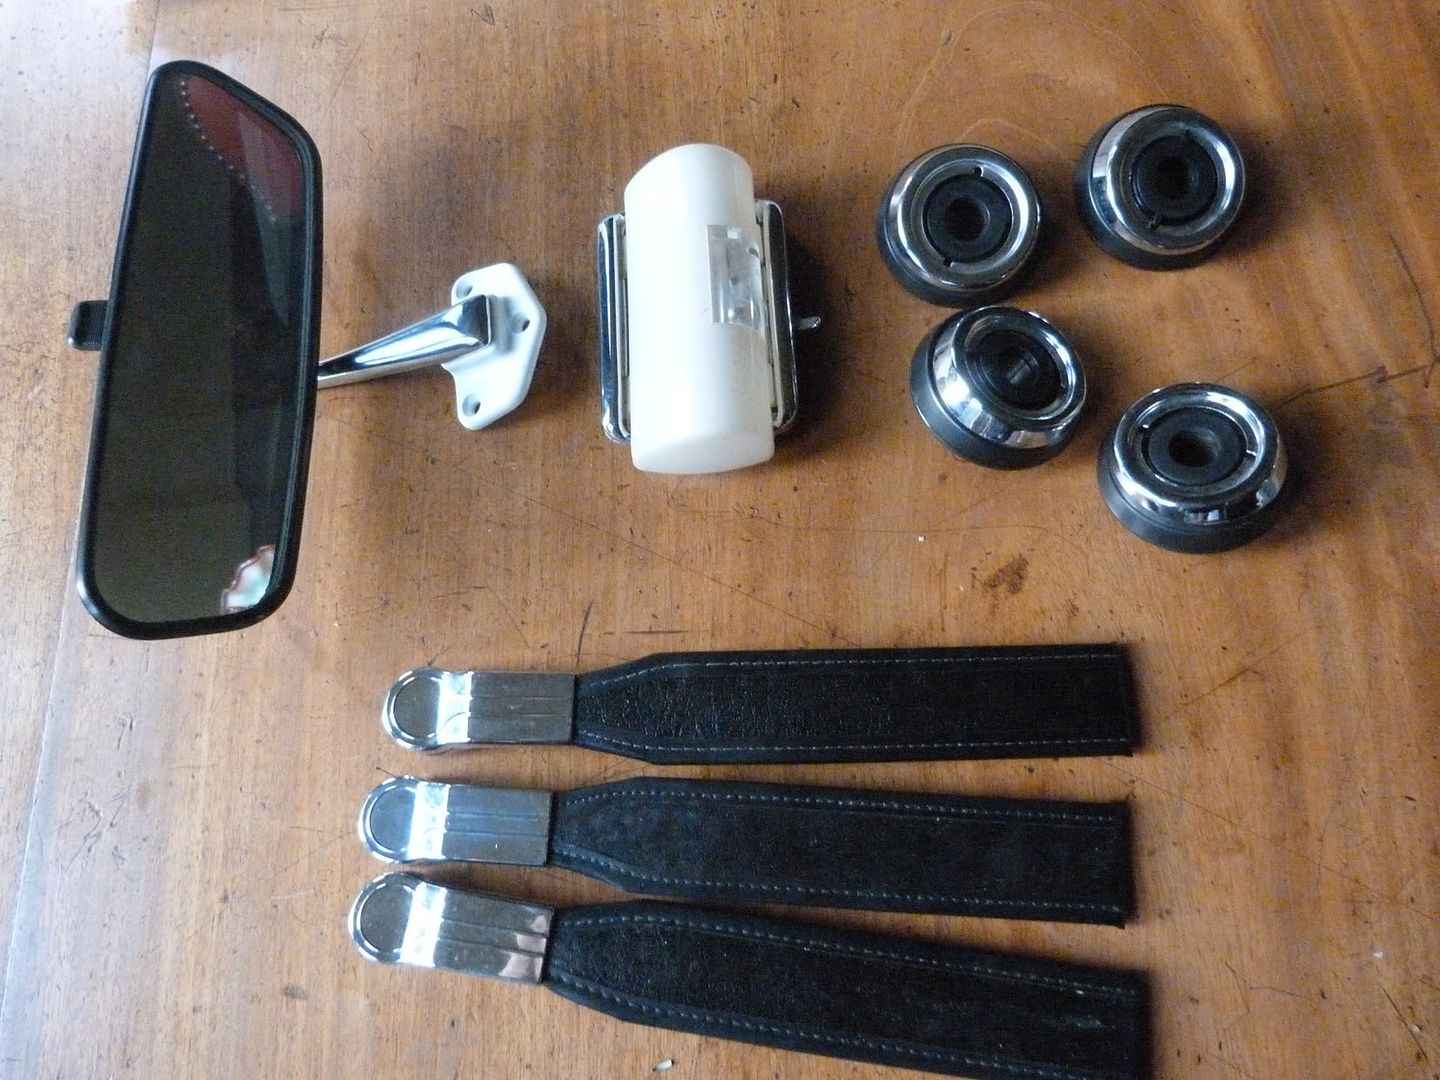
And finally I went through my boxes of parts in the cellar to locate the new sunvisors
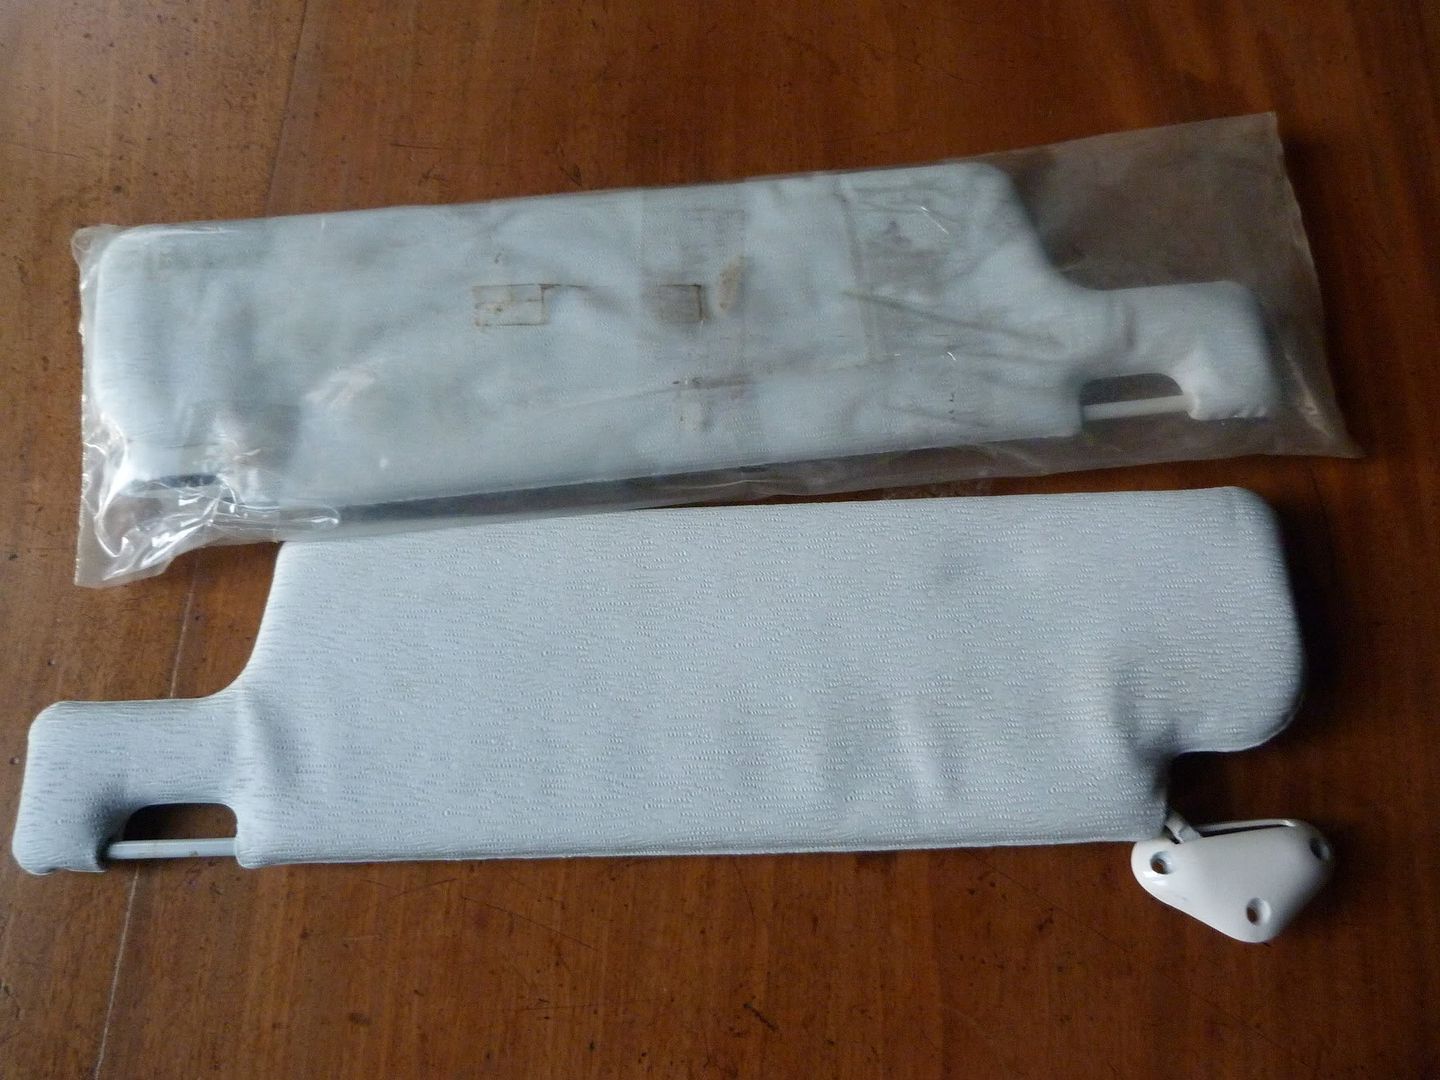
The rear view mirror, grab handles, both left and righthand, the rear estate interior lamp, and bits and pieces for the window winders
All ready for fitment when I finish the headlining, I collect the heads tomorrow, so i shall be assembling them in the next few days, much as Richard is illustrating on the CT Forum.
These little jobs don't add up to much, but all take ages, and they are more and more items removed from my jobs list, the end is almost in sight now.
Hours worked now 827 - 5 today
Still work must progress so I attended to a few of the small outstanding jobs. Firstly I cut down and reshaped the new battery bar retention hook, so that's now complete.
I got the horns fitted and tested. There is normally one each side of the radiator, but because the battery box is fitted on the driver's side, both horns have to fit here
And finally I went through my boxes of parts in the cellar to locate the new sunvisors
The rear view mirror, grab handles, both left and righthand, the rear estate interior lamp, and bits and pieces for the window winders
All ready for fitment when I finish the headlining, I collect the heads tomorrow, so i shall be assembling them in the next few days, much as Richard is illustrating on the CT Forum.
These little jobs don't add up to much, but all take ages, and they are more and more items removed from my jobs list, the end is almost in sight now.
Hours worked now 827 - 5 today
Saturday, 7 January 2012
How to get it up and stay up !
The tailgate .. what else?
And you all thought today's blog would be about cylinder heads, well its not, and they won't be mentioned again for a few days.
However it was time to deal with the tailgate, so after removing this, I then unbolted the hinges and torsion bars.
I had realised that if I could reuse my hinges, with new bars, then the tailgate fit would remain good, and perhaps it would stay up without a broom supporting it!
How to get the torsion bar out was surprisingly easy, first hold the bar in a vice, and then rotate the hinge assembly with a pair of stilsons, until the one captive end (L shaped) of the bar came out of the hinge bracket

Not too difficult as there wasn't too much tension in the cut and shut re-welded bars. Reassembly with the new bars was a different issue,needing a good bit of pressure to align everything.
However the bar was still held in place by this "clamp"
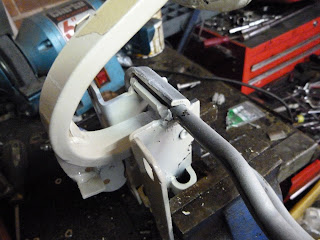
Some oxy-acetylene heat soon softened the metal and let me open this up, and the bar came out. You can see how little tension it would give, if you compare it with an un-cut original bar (note the weld in the white bar done by the paint shop

Reversing this entire process had the 2 replacement bars fitted to the hinge assembly, however with the hinges properly tensioned they wouldn't go back in the car. I had to open up the hinge angle, and leave it fixed in the nearly open position, which was achieved with a long bar on the hinge arm to apply enough leverage, and a cut down bolt wedged in the mechanism

repeated with the other hinge, I was then able to refit the tailgate, and then remove the cut down bolts.
Does it work ?


yes, a perfectly balanced tailgate, that will stay in which ever position you open it to.
What joy ! another nasty job complete, and only minimal marks to the paint on the hinges, most of which will be covered by various trim items in due course.
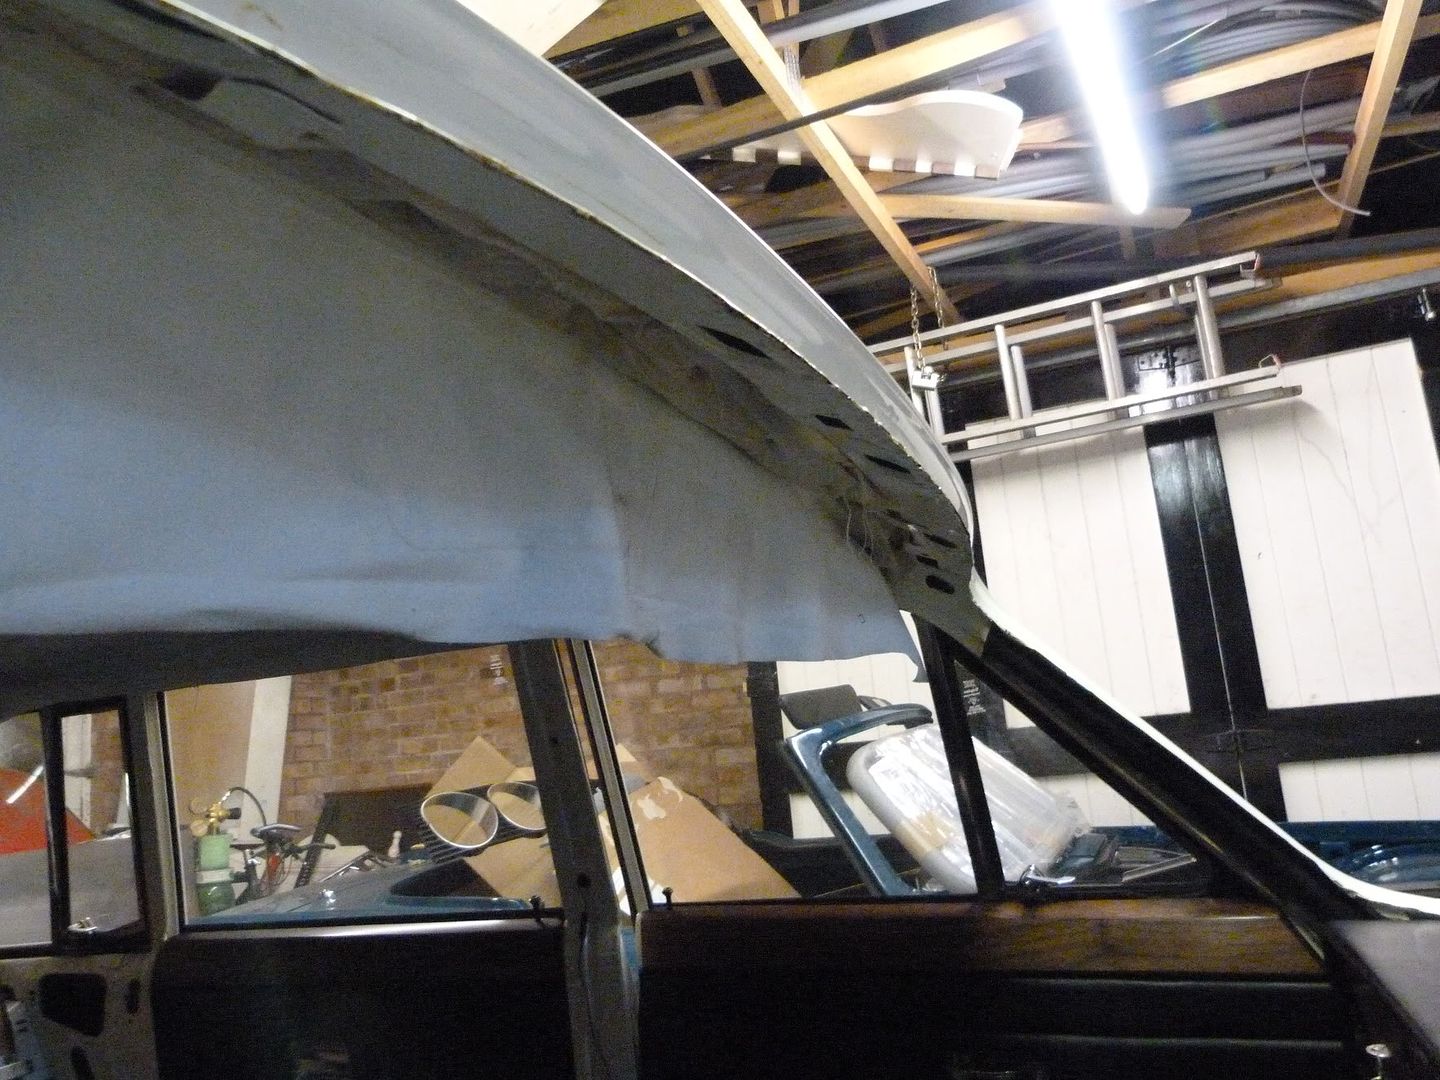
So what next, has to be the headlining. First I needed to glue back in the sound deadening pads fitted by Triumph. I don't know what glue they used, but modern glues don't seem to stick very quickly, so I had to hold the pads in place for 10 minutes or so as I applied glue to each area. Pig of a job, glue everywhere, in my hair, on my clothes, and some where it was needed. Eventually all was in place

No excuse now but to fit the lining


I know its full of ripples, but I am going to leave it overnight, remove the front screen, tension it all, which is done via these strips of cloth at the tailgate end, and by pulling down the sides, and gluing and clamping

and hopefully have a good tidy headlining, but that's for tomorrow as I want a beer now!
Hours worked now 822 - 7 today
And you all thought today's blog would be about cylinder heads, well its not, and they won't be mentioned again for a few days.
However it was time to deal with the tailgate, so after removing this, I then unbolted the hinges and torsion bars.
I had realised that if I could reuse my hinges, with new bars, then the tailgate fit would remain good, and perhaps it would stay up without a broom supporting it!
How to get the torsion bar out was surprisingly easy, first hold the bar in a vice, and then rotate the hinge assembly with a pair of stilsons, until the one captive end (L shaped) of the bar came out of the hinge bracket

Not too difficult as there wasn't too much tension in the cut and shut re-welded bars. Reassembly with the new bars was a different issue,needing a good bit of pressure to align everything.
However the bar was still held in place by this "clamp"

Some oxy-acetylene heat soon softened the metal and let me open this up, and the bar came out. You can see how little tension it would give, if you compare it with an un-cut original bar (note the weld in the white bar done by the paint shop

Reversing this entire process had the 2 replacement bars fitted to the hinge assembly, however with the hinges properly tensioned they wouldn't go back in the car. I had to open up the hinge angle, and leave it fixed in the nearly open position, which was achieved with a long bar on the hinge arm to apply enough leverage, and a cut down bolt wedged in the mechanism

repeated with the other hinge, I was then able to refit the tailgate, and then remove the cut down bolts.
Does it work ?


yes, a perfectly balanced tailgate, that will stay in which ever position you open it to.
What joy ! another nasty job complete, and only minimal marks to the paint on the hinges, most of which will be covered by various trim items in due course.
So what next, has to be the headlining. First I needed to glue back in the sound deadening pads fitted by Triumph. I don't know what glue they used, but modern glues don't seem to stick very quickly, so I had to hold the pads in place for 10 minutes or so as I applied glue to each area. Pig of a job, glue everywhere, in my hair, on my clothes, and some where it was needed. Eventually all was in place

No excuse now but to fit the lining


I know its full of ripples, but I am going to leave it overnight, remove the front screen, tension it all, which is done via these strips of cloth at the tailgate end, and by pulling down the sides, and gluing and clamping

and hopefully have a good tidy headlining, but that's for tomorrow as I want a beer now!
Hours worked now 822 - 7 today
Tuesday, 3 January 2012
Under the Roof
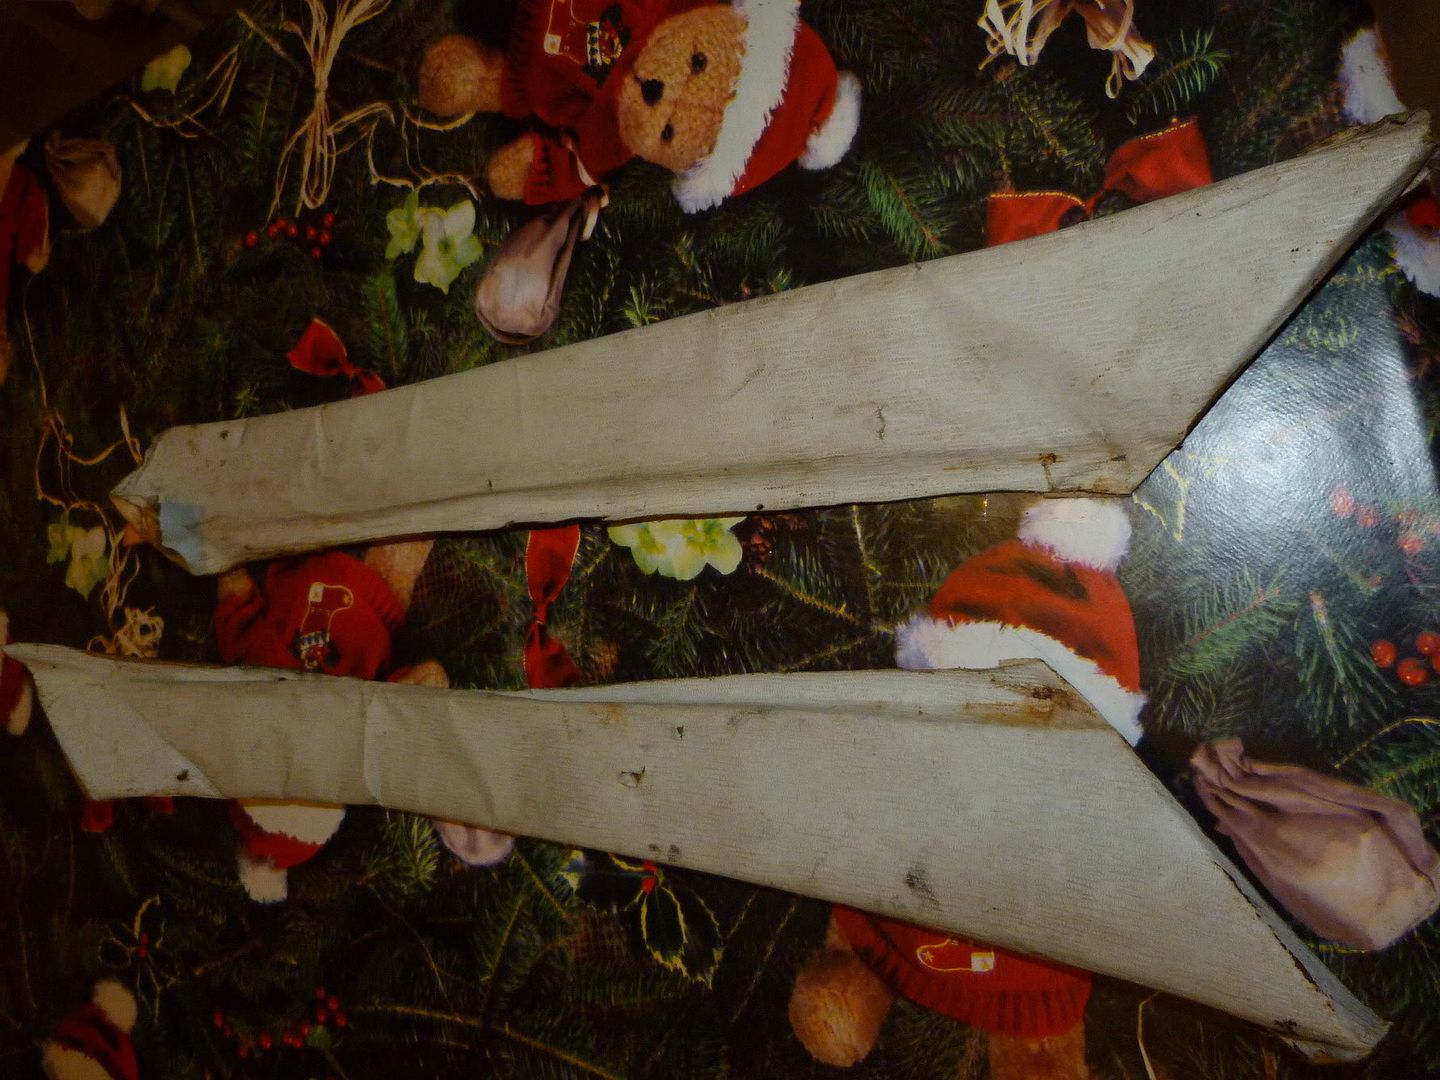
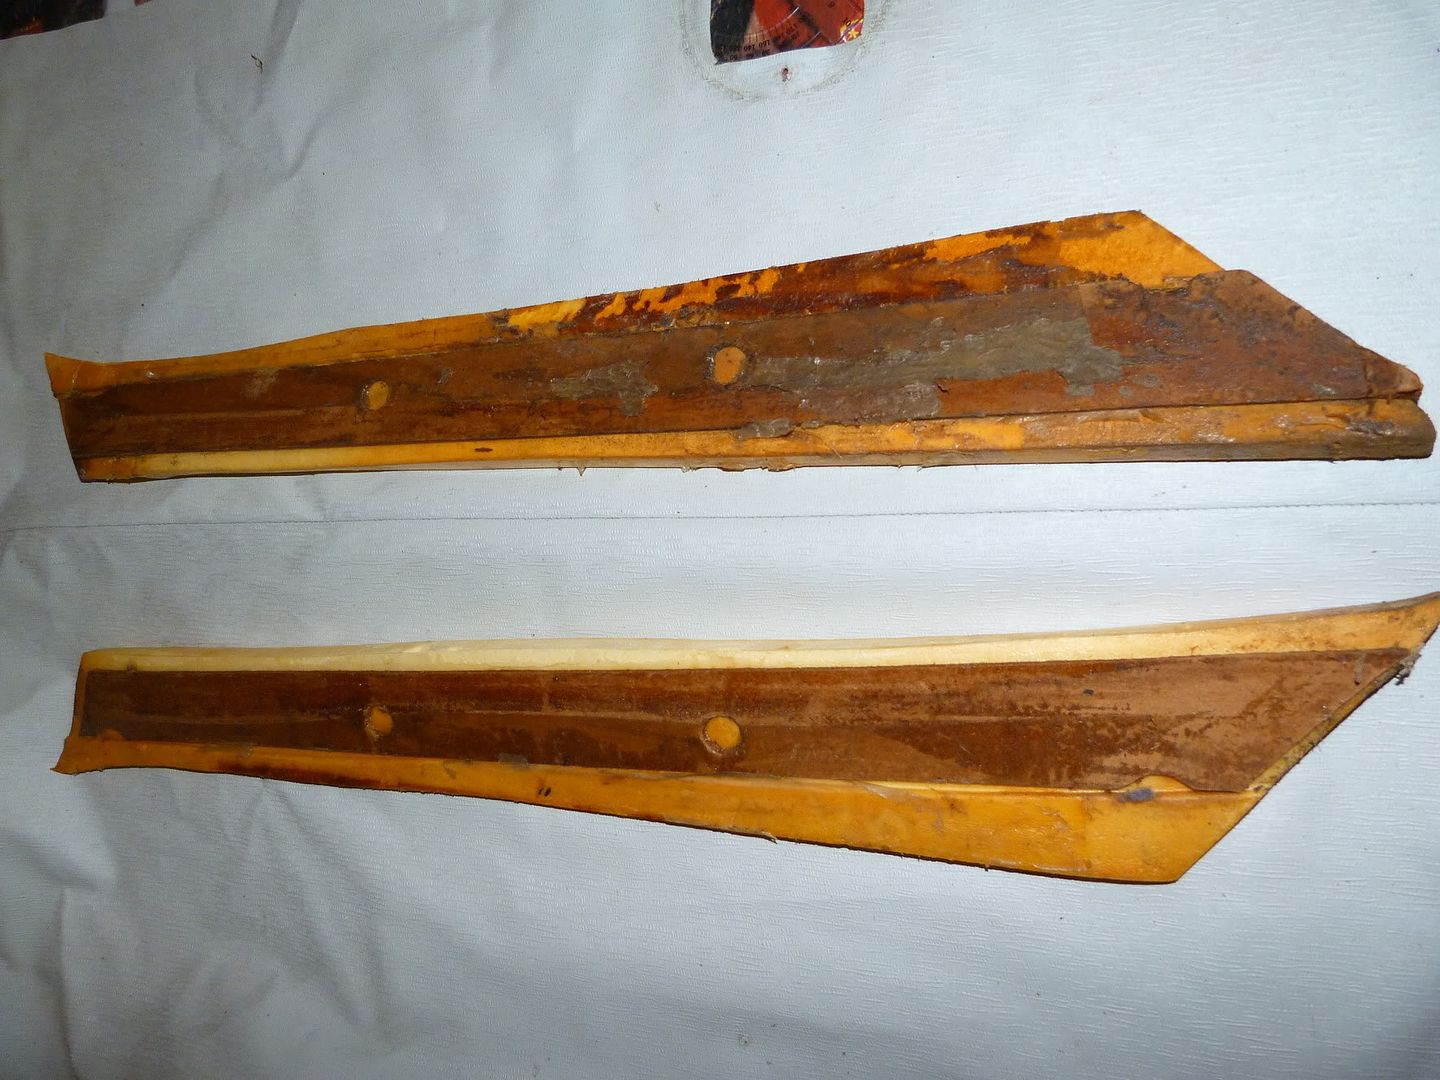
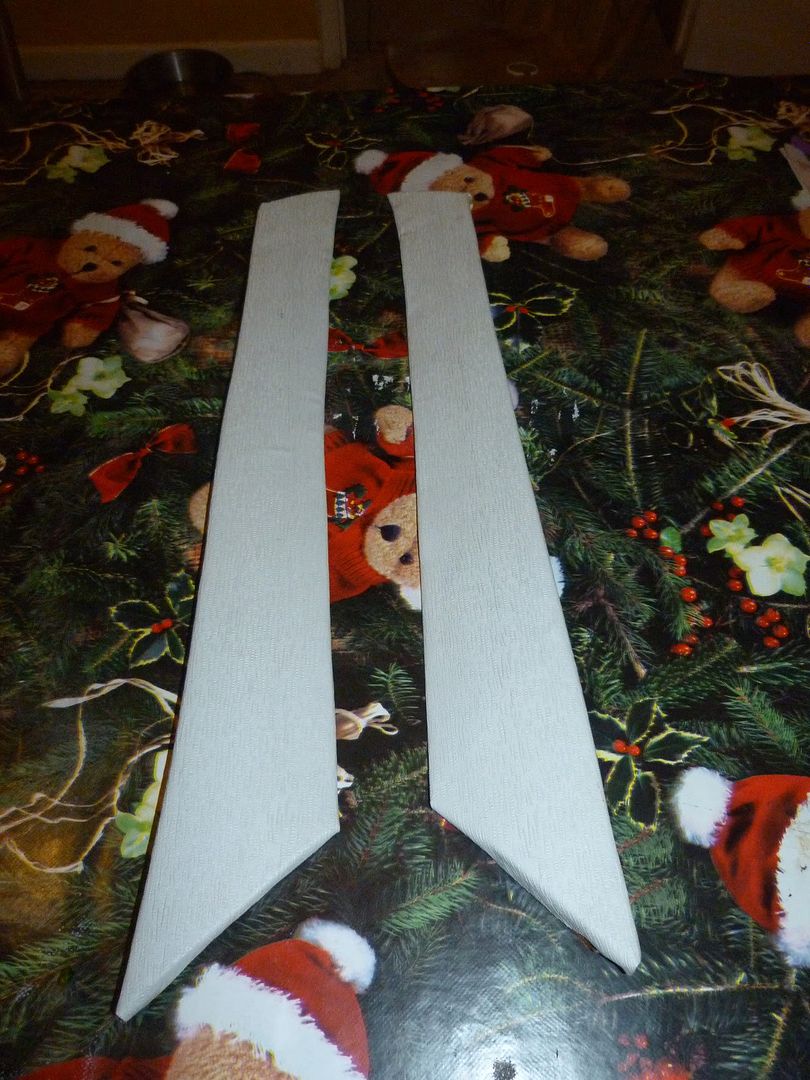
I need to attend to the tailgate tortion bars, but its a job that I have been putting off, however I cannot delay much further as I have now picked up the new headlining from Aldridge Trimming. Its a really great job done by them, in the original material too, here's the old grubby one, complete with rips and various stains.


And here's the new one, a little wrinkly until its fitted, but beautiful and unmarked white

This meant that I had to attend to the tailgate hinge cover, as the old one looks worse than the headlining

This has had a good clean and 15 coats of vinyl cote to bring it up looking like this

So I have to now tackle the hinges, or maybe not, because I have just had a telephone call from Roy Burrel to tell me that the heads are done and ready for collection. No competition is it really, lets see, faf about with the hinges, or get the heads, fit the cams and valves etc and fit the heads inlet manifold and shiny reconditioned carbs, I ask what would you do?
Sadly the tailgate will have to wait for another day.
Money spent now £17732 - £127 for the headlining
Subscribe to:
Posts (Atom)