Sunday 27 February 2011

I prefer to call it cleaning

2 days work, and only one blog update, because I went out with Anne last night and didn't have an opportunity to update the blog.

I am trying to fit as much as possible to the car before it goes to Stoneleigh on the 2000 Register stand, and I want to make it water proof this time. Hunting for removed parts (to refit) in my shed, always turns up some other items to fit too.

I wanted to get the fuel tank in, so I could complete the fuel lines, so first job was to inspect the sender. Like everything else, rusted solid, so new one to hand it was put in the tank.


Then I remembered that before the tank goes in, there are some sound deadening pads to fit, and from the depths of the shed here they are,  what a mess!


Covered in paint, underseal, ziebart and grot, so after cleaning ( I'll leave the polishing to others!) with white spirit and soapy water they look almost new when glued into place


so next it was in with the repainted tank, and make the fuel lines up


typically the replacement filler hose has too large a diameter to fit the original hose clips, so thats another item to purchase, and when I fit those, I will also fit the breather pipes and drain from the fuel filler. I also need to fit another inline fuel filter before the fuel pump.

While in the shed I found and cleaned various other sound deadening pads and fitted those too


I cannot find a footwell mat for the passenger side, so that looks like another part to aquire.

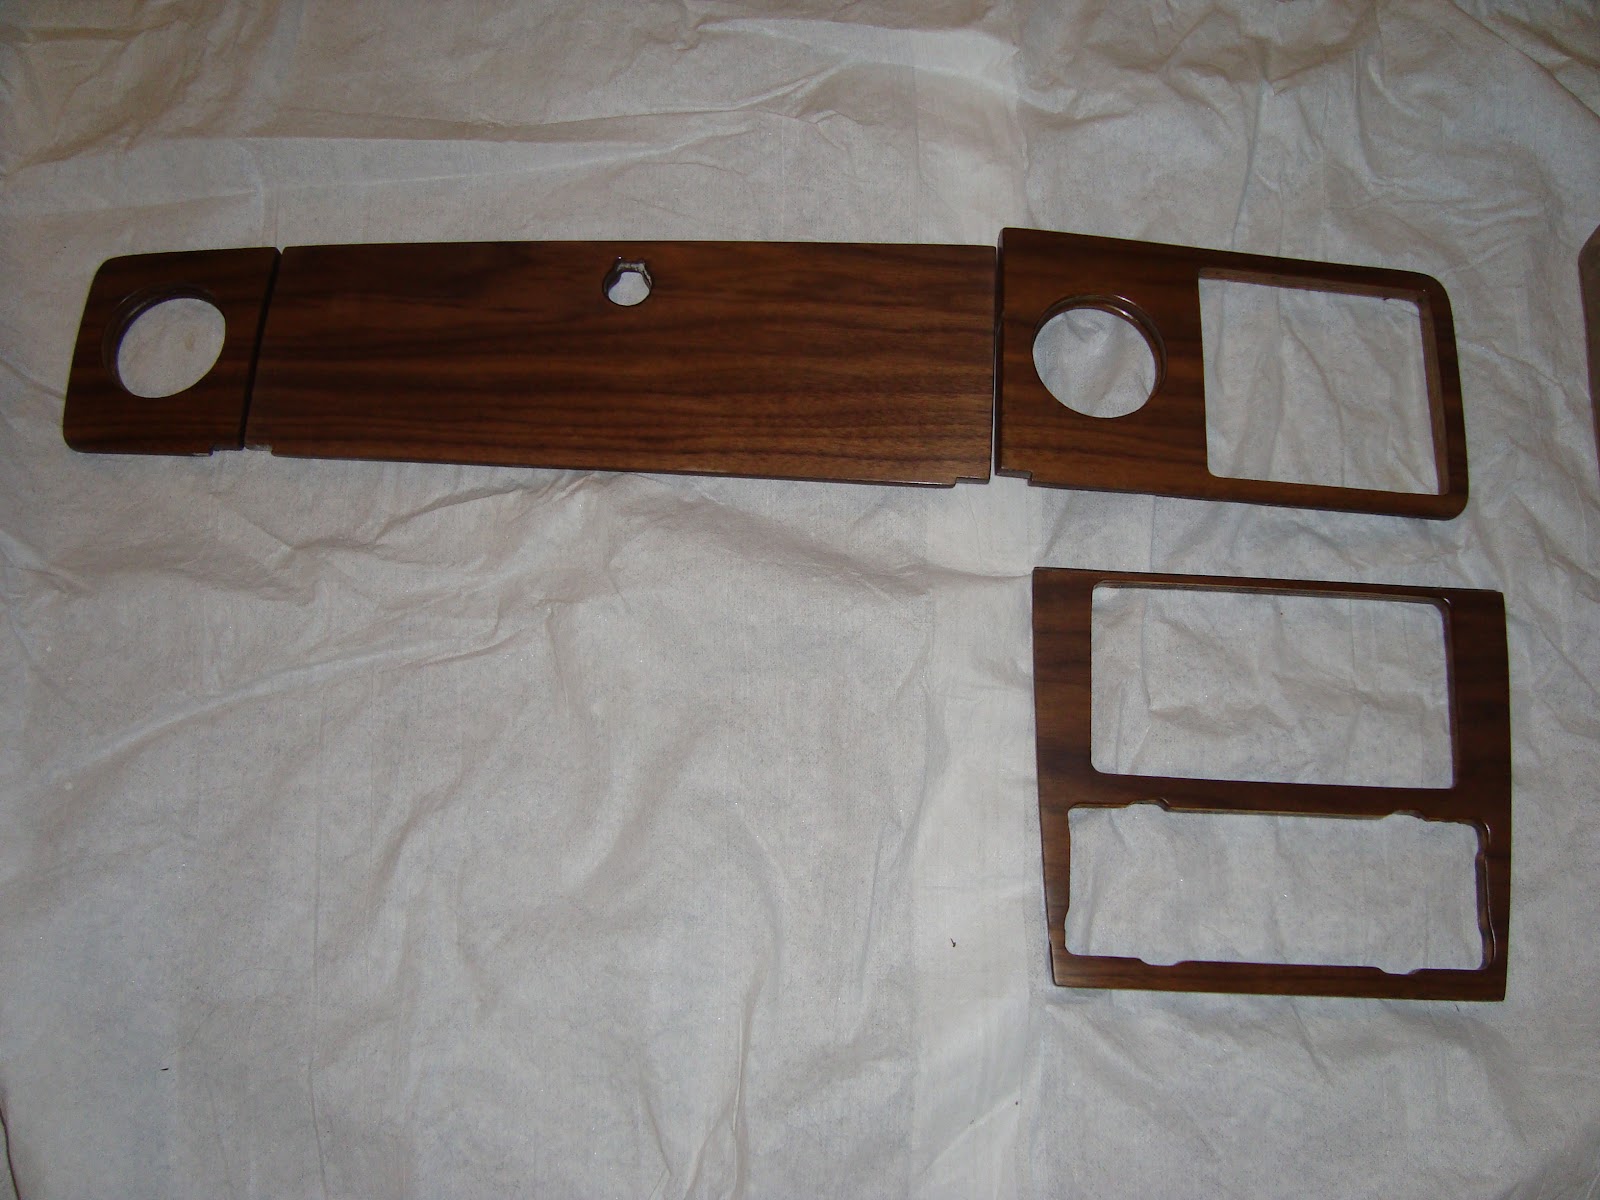
Having also found the choke / heater cable re-inforcing bracket in the shed, I wanted to fit the centre console.

I had purchased a new Stag choke cable (it needs 2 cables for the 2 Strombergs) however the Stag knob is incorrect for a 2000, now this should be easy to change, the original ones have a little pin you depress and they slide off the shaft. Sadly not the repro cables, the knob is molded onto the shaft and is not removable. The fix was obvious, use my old inner shaft, inner cables and knob with the new outer assembly and outer cables ( it was the outer cable sleaves that were U/S on the old unit. However that means threading the 2 inner cables down a 3 inch tube into the correct and narrow inner core of the cables. Not Easy !! in fact a real pain, I wish I hadn't started this game. I hour later and much swearing I achieved the almost impossible, and here's how the complete assembly looks when fitted. Well worth the grief in retrospect.


The it was time for the rear doors, got all the mechanisms in these, and the winders fitted. I still need to fit some rubber to hold the glass in the lower channel that lifts it up and down, but it all works, and as soon as I fit the rubber strip the door cards can go on.


I need to refit the rear estate windows now, but these are simple and the fit will be temporary, because there is a little bit of paint rectification to be undertaken around the rear window frames, before these can be completed.

780 hours now worked, 14 in the past two days.

Sunday 20 February 2011

Doors and Glass.

First job of the day was to get the new gear selector rod fitted and the gear stick actually connected up (the auto parking brake now works too!)

I cleaned up and fitted the starter inhibitor wiring at the starter end, and to the reverse light circuit, and then found that there is no way to get to the inhibitor switch until the front propshaft is removed - I left this for now, it can go on the pending jobs list.


The rest of the day has been spent fighting with door lock mechanisms, window winder parts, and all the other inaccessible parts inside the front doors. I have fitted the polythene liners too, I remember from bitter experience with my Stag that if these aren't fitted the door cards get damp.

I had 2 nos front windows from Chris Witor, so these went in. The worst job was remembering how to get the winder mechanism in. At one point I thought it needed to go in before the glass and the quarter light frame, but luckily at the correct angle, with the fixing mechanism at a certain position compared to the lifter arm in it went.

So here we are 2 front doors complete, with window seals, door cappings etc etc, just the striker plates to adjust now


I want to finish the rear doors next week, handbrake cable and a few other jobs so its water proof and ready for Stoneleigh.

766 hours now worked, 8 today.

Saturday 19 February 2011

Dash it

With the arrival of the reconditioned wood from Chapman & Cliff I couldn't wait. Today had to be the day the dash went in. Took a long time, there were more bits that needed cleaning and painting, including the glove box hinges, but it was well worth the effort, its looking more and more like a car as the parts go back on.


Its only a trail fit of the centre console and heater controls, I wanted to see it all fits (and the finished result too!), but its got to come out to fit the gear selector linkage, from the box to the gear stick. I do have one, but like a lot of the original parts its very very rusty, so thats another item I got from Justriumph. The gear selector cover does fit, but I have no clips for it at present, so it won't fit correctly unless you hold it in place. I also cannot find the switch panel reinforcing plate, so its either time to make one, or have a good hunt about for it.

I managed to pop rivet the metal straps under the plenum vents today too.


I also solved a mystery today!

For some time I have been wondering where the cable is that connects to the gearbox inhibitor switch for reverse lamps and the starter inhibitor, with it being an automatic.

While I was hunting for other bits I found this.

Its a small loom extension, the 4 lucar connectors on the right connect to the inhibit switch, the 2 green (currently dirty black) wires connect to the existing reverse lamp switch wires, and the 2 white red wires go to the starter motor and pick up the solenoid wiring diverting it via the inhibitor switch. Obviously no relay fitted then! just a simple break switch in the starter ignition wiring. Thats got to go on the car, and sooner rather than later. When I get the gear selector wired up, I can test the inhibit switch and then fit this. I hope the inhibit switch is reliable!

After that it will be back to the doors and their fittings, I'd like to finish the front doors tomorrow, and get their wood trim on.

Hours worked 758 7 today and 3 in the week

Money spent £14730 - £495 on the woodwork

Wednesday 16 February 2011

Got the Wood

I've been to Nantwich today, and got all the wood work from Chapman & Cliff, fantastic job, my pictures don't do it justice. The pattern is matched the entire way across the dash, from air vent on the left, glove box, clock panel to instrument panel. Sets off the reconditioned instruments well doesn't it?


The grain on the door cappings is also mirrored from side to side.

Brilliant job, now to fit it to the car - very carefully.

Also got a really good second hand petrol tank from Martin at Justriumph, so after painting that can also go in the car this weekend

Monday 14 February 2011

Bits and Pieces

As I didn't get my Sunday work in on the estate I am trying to do a few hours most nights this week, so remaining underbonnet jobs tonight. Firstly the metal bulkhead fittings under the plenum vents. These are always rusty, and certainly weren't fit to refit, so I cut 2 out of some 2mm stainless steel - pity the pop rivets that I had aren't long enough to go through them, the mat and the bulkhead!


Power steering pipes next, got them out of the packet, and found they don't fit, you can see the end of the flare below, and the red plug in the rack where one of them should fit - with the drive shaft underneath. So I peered under the bonnet of my Stag, and I realised that where they normally exit the rack, there's a drive shaft, so they have turned the housing round by 1/3 of a turn (it has 3 bolt holes), this of course means the bends in the pipe, and the pipes are too long.

Luckily my brake pipe flaring tool will cope with the 1/4" and 3/8" pipes, so I cut the old flares off, and some pipe length, reflared them and they now fit. Although they may need a bit of "tweaking", so I need to trial fit the head and power steering pump to check this before finally tightening them.

Thats it for now. 2 hours work tonight.

Saturday 12 February 2011

Steering Column and Doors

The new bearing for the column arrived yesterday, so now was as good a time as any to fit it.

Removal is easy undo the circlip, the spring and washer pop off, and the bearing can be drifted out - I use the existing shaft, by drifting it upwards until it clears the bearing, let it drop down then drift the bearing out by tapping it from the other end.

The bearing is a gentle push fit in the column, but you are then left with the problem of how to compress the spring and fit the circlip


Simples really, undo the circlip at the other end of the shaft, and push it up the shaft, together with the indicator canceller, then drift the shaft down again
It will suddenly have enough room to fit the circlip, washer and spring


To finish, push down on the steering column, from the top, this compresses the spring, lets the shaft slide upwards, and enables you to push the top circlip home, job done, just refit the column now, and add extra grease to the lower bearing

That done, I fitted a few more missing grommets from the floorpan and bulkhead, a missing circlip to the windscreen wiper drive motor and then started on door locks and glass. This work was a little slow, as I hadn't documented or separated the parts from the 4 doors when I stripped them, everything looks the same, ( a front door lock, fits a rear door, but then you discover you cannot fit the linkage for the inner door opener - ask me how I know!) but has subtle differences, so I needed to work out where it all went, then clean and degrease it etc etc.

Still got the glass in the front passenger door, door locks fitted and weather seals in.


New old stock inner door handles, nos 1/4 light assembly, just the window winder to fit here.

Did the same on the passenger rear door too


When closed the door seals are pushing the bottom of the doors out a little, hopefully that will improve as the rubber gets used to being compressed - its not an issue from pattern rubber parts either as the front door seal was a genuine nos Stanpart one - a little adjustment will be needed to hinges and locks too, but both doors are good enough for now.

I haven't fitted the winder mechanisms, as I may yet change the glass, in the cold light of day there are a lot of marks on the glass, and as nos clear windows are still available and are relatively cheap it may be worth the small extra effort of changing them - something to mull over in the next few days.

I collect the woodwork on Wednesday, so dash and instruments are definitely going in next - I cannot wait to see what it will look like, doors and glass will wait again.

Hours worked 748 - 7 today
Money spent £14235 - £30 for the column bearing

Wednesday 9 February 2011

Better Progress Today.

I started today with some simple jobs, fitted the radiator expansion bottle mount, and the bottle (not much room near this FF vacuum reservoir)


Then it was time to fit the fuse box mount


and the accelerator pedal


then back to the transmission oil cooler pipes, new flexible pipes fitted and everything fastened down with P clips

I then finished the under bonnet wiring using P clips again


This means that I can now progress the engine and fit the heads, as all this wiring will become inaccessible soon.

Some other trim jobs done too, like the sill embellishers (horrible job marking out and fitting 10 clips each side all in a straight line to hold the trim on)


I then removed the steering column to attend to the play that I had caused in it, when I originally refitted it.

However when the play was cured (by removing the updown movement on the shaft) I found that the bottom shaft bearing was as rough as a badger's arse! Its a roller ball race, tensioned with a spring, and it must have corrosion in the bearing race. There's no seal or protection for the bottom ball bearings and it must have suffered from the rust bug that the rest of the car had. These are still available but about £30 each!, still I bit the bullet and ordered one and will replace the column later


Replacement is easy, remove the circlip, then the spring, drift the inner column up and out, then pull the bearing out and reverse the process.

Still that was enough for today.

Hours worked now 741 - 8 today

Tuesday 8 February 2011

What a Faff about

The plan for today was simple and I thought straightforward, fit the transmission oil cooler, so I could fit the pipes, then fasten down the various wires pipes and clips in the engine bay.

Nothing was simple, for some reason (hangover??) it took me a couple of hours to figure out the fitting arrangement of the oil cooler to its brackets, drill the hole for the pipes through the radiator support panel, and fit it all in place behind the front valence.


Still that done, onto the pipe work, I had purchased some new pipes in copper, and I got those in place only to discover that the flexible pipes from the transmision are too short.

You can just see the air gap of about 8 inches to one of the pipes under the oil pump. So off with the flexible pipes (which are now going back to the supplier) and a trip to Pirtek to have some custom ones made up to the correct length. When the flexible pipes are installed, I can shorten the copper pipes as required, as the oil cooler end has a clamp "olive" type arrangement allowing the pipe length to be shortened. Once done the pipes and heavy cables will be secured with P clips - some nice stainless steel ones also visible with old and new flexible pipes below, and all should be neat tidy and reliable.


While I was out I also collected from the powder coaters, my fusebox and relay holder and the expansion bottle bracket.


Unlike Stags, the bottle holder was only pop riveted in place (like the battery box - because of the nature of the prototype modification) and the ecoating process had dissolved the pop rivets! - so thats another 2 items to fit tomorrow.

Costs now  £14205 - powder coat and pipes

Hours worked now 733 - 5 today, 7 at the weekend

Sunday 6 February 2011

2 Jobs Completed Today

Only 2 jobs finished on the estate today, but both essential to see it running, firstly I finished the fuel lines from the tank via the pump to the under bonnet fuel filter,


and then I made up all the brake pipes on my own trusty brake flaring tool.. Because I have used copper pipe I have fitted some extra brake pipes in some places, essential where you are using copper as it is prone to fatigue fractures where it is unspported over long lengths. The original steel pipes don't require as much support.
This photo is prior to fitting the front to rear pipe and the remaining offside front pipe.

Because I didn't have patterns for most of the pipes, I used a thick piece of cable as a "dummy" pipe to get the length correct before cutting and flaring the pipe.

and to save corrosion issues stainless steel unions


Chapman and Cliff have also telephoned to say that all the wood work is ready for collection so I am off to nantwich to collect it next week, so I will be able to get the dash and instruments in and complete.

Where am I?